
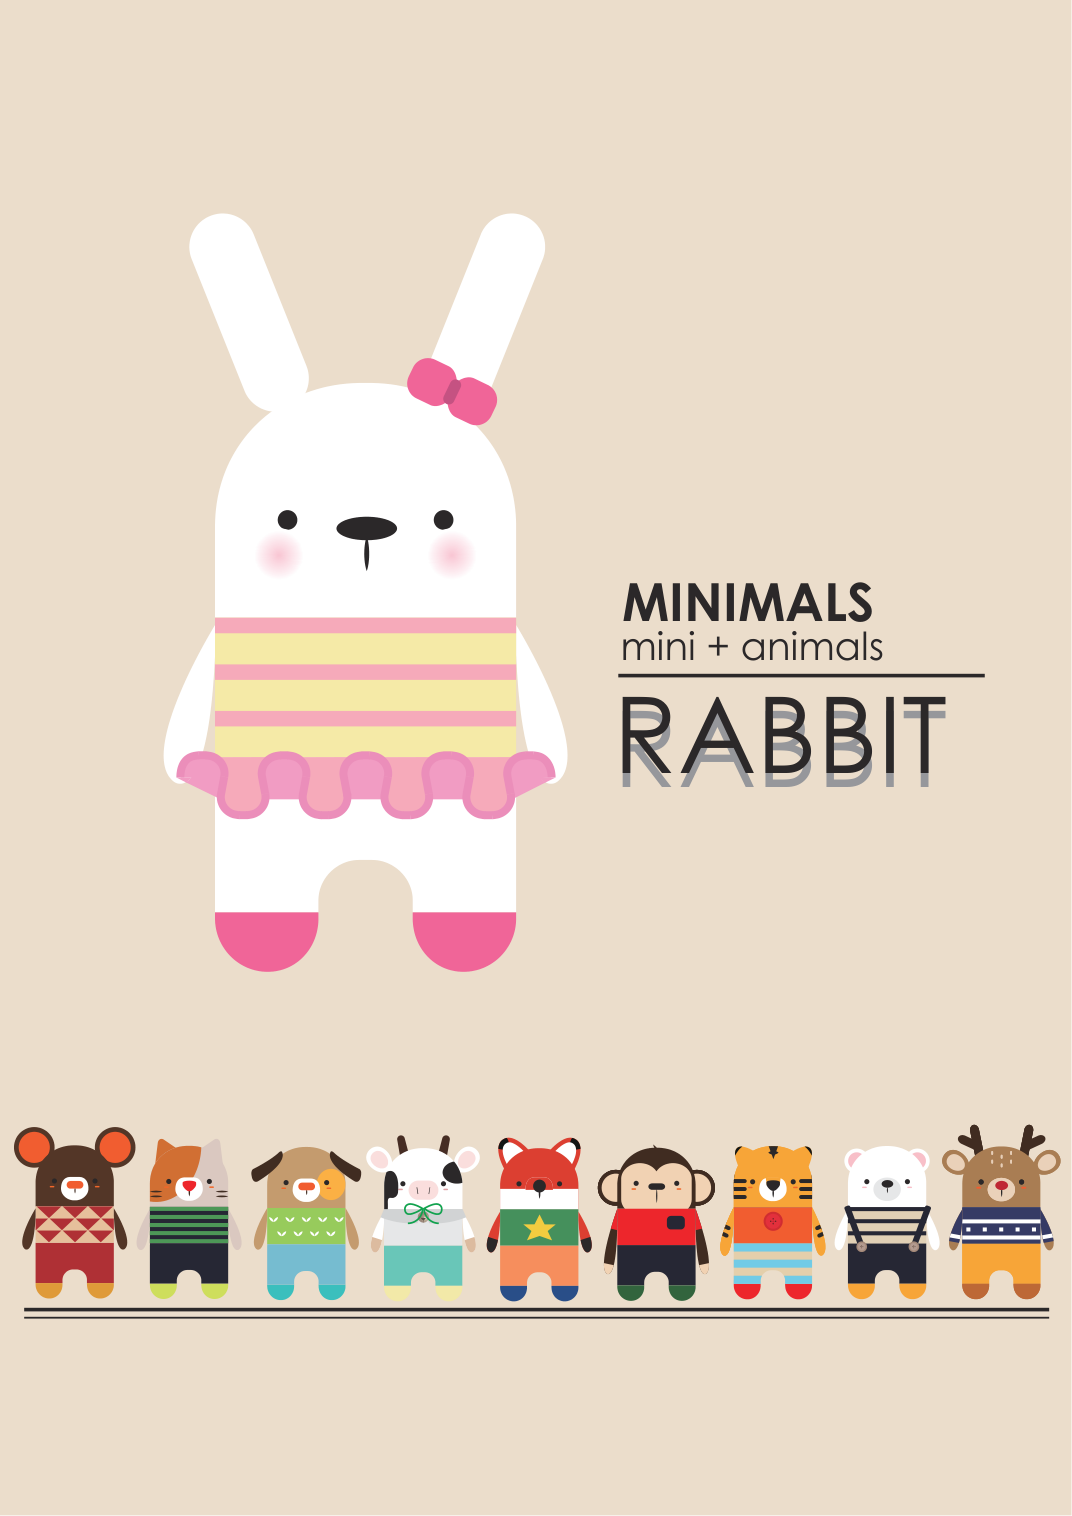
Mini Bunny Crochet Pattern
This mini bunny crochet pattern features a long-eared rabbit in a striped dress, with a ruffled skirt and a little pink bow. Read the written instructions alongside the original charts and photos.
Before You Start
This mini bunny crochet pattern makes a white rabbit with long ears, a striped dress, a ruffled skirt, and a pink bow. The supplied PDF combines written rounds with color charts and original construction photographs. Use both: the round-by-round text does not repeat every color change.
This guide organizes the supplied rabbit pattern for reading on screen. It has not been independently test-crocheted by Stella Crochet, and no difficulty rating or completion time is stated in the source.
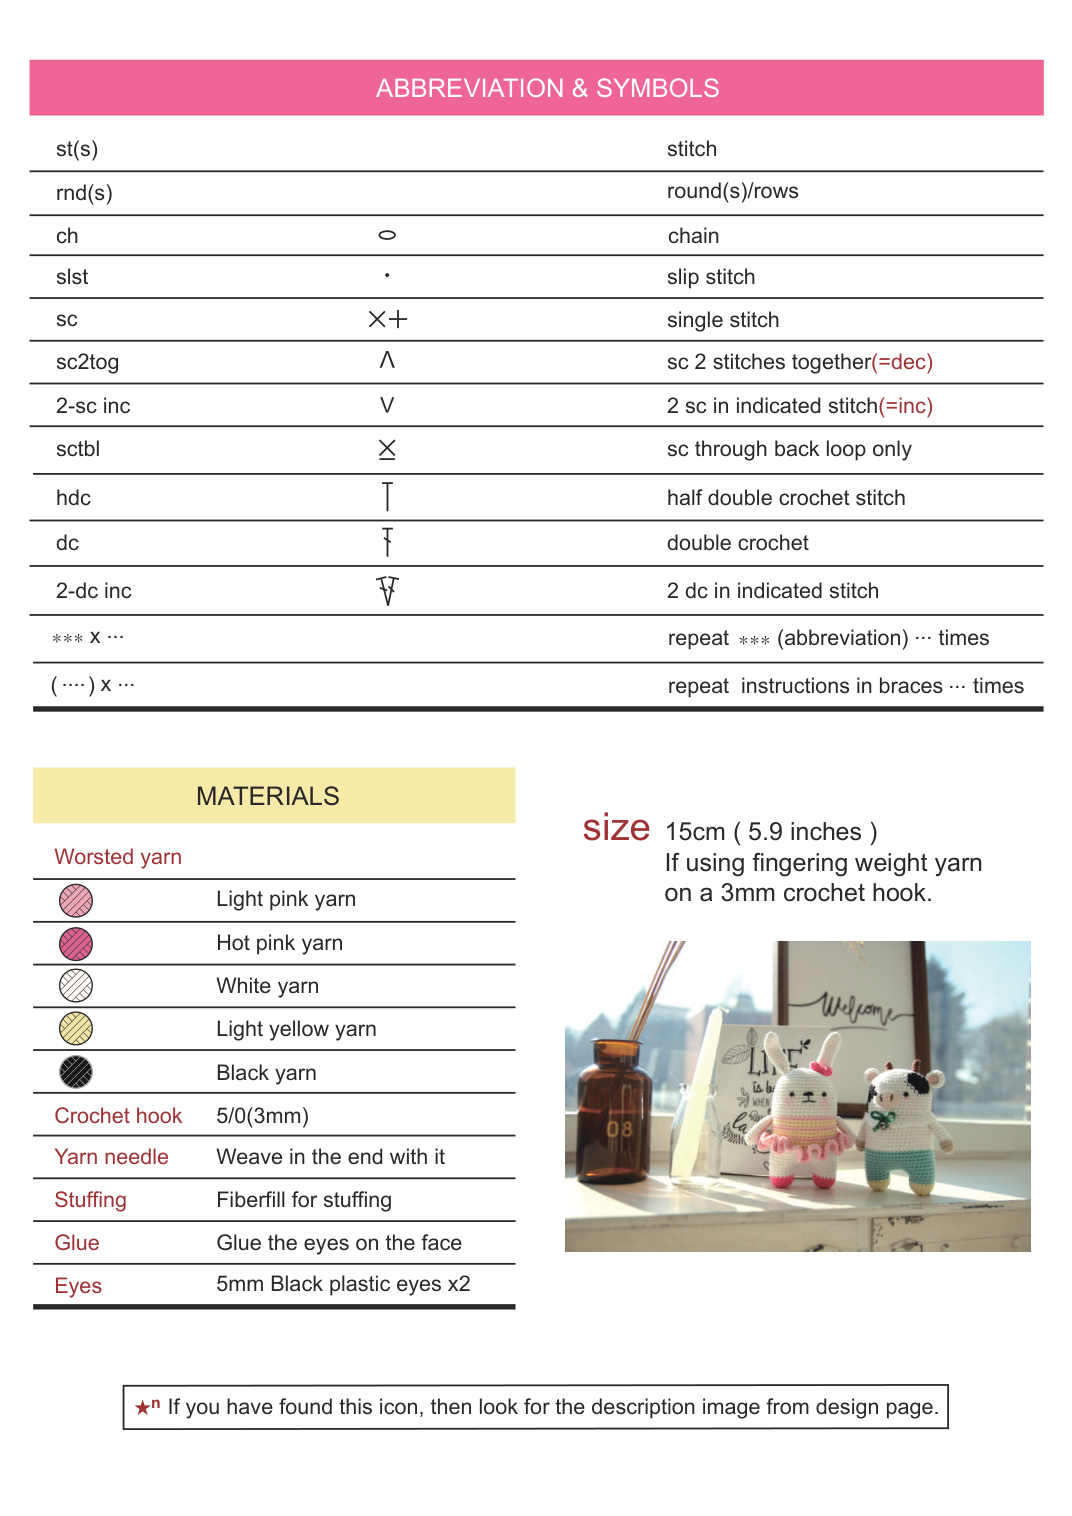
Materials for the Mini Bunny Crochet Pattern
- White, light pink, hot pink, light yellow, and black yarn. See the yarn-weight conflict above.
- 3 mm crochet hook, listed as 5/0 in the source.
- Fiberfill stuffing.
- Yarn needle.
- Two 5 mm black plastic eyes and glue, as listed in the PDF. Choose an appropriate secure alternative for the intended recipient; glued eyes are detachable small parts.
Check the original materials page in the source reader before buying supplies. Yarn amounts, an exact gauge, and a tested size range are not provided.
Stitches and Reading the Charts
The pattern’s stitch definitions correspond to US terminology. A general reference is the US crochet abbreviation reference.
| Term | Meaning here |
|---|---|
| sc | Single crochet |
| inc / 2-sc inc | 2 sc into the indicated stitch |
| dec / sc2tog | Single crochet 2 stitches together |
| sl st / slst | Slip stitch |
| ch | Chain |
| hdc | Half double crochet |
| dc | Double crochet |
| 2-dc inc | 2 dc into the indicated stitch |
| sctbl | Single crochet through the back loop only |
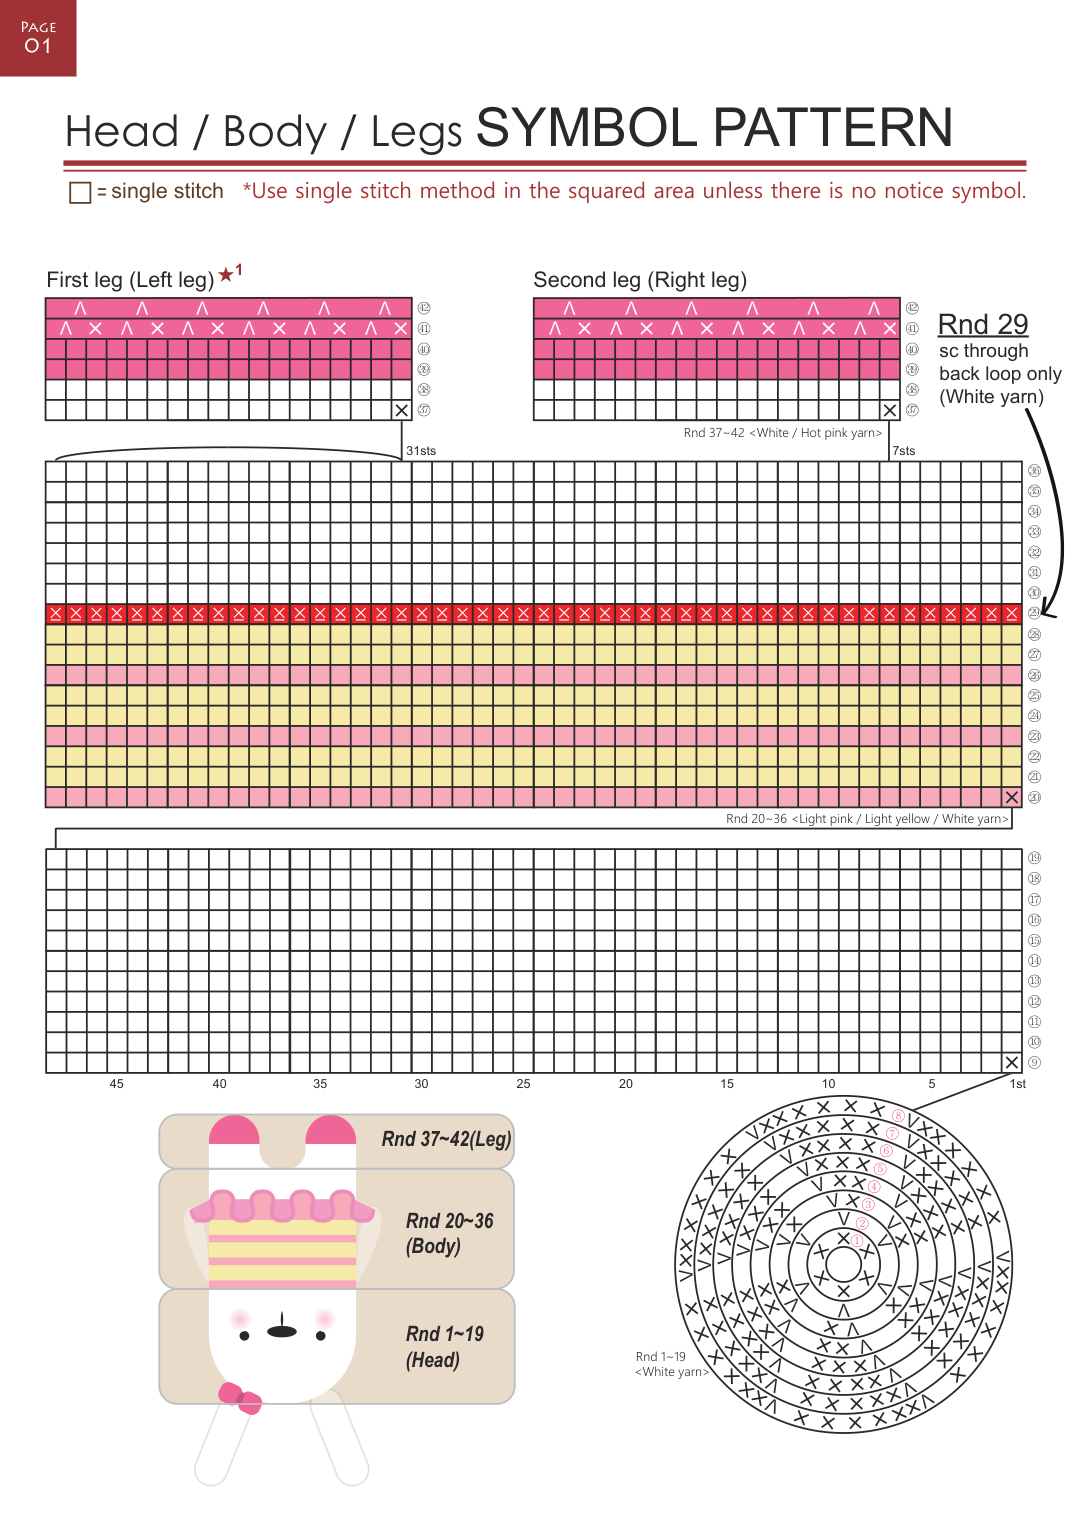
The plain chart squares indicate single crochet unless another symbol is shown. Follow the body and leg color charts on PDF page 3. Its printed page number is “Page 01”; that is why the written pattern refers to a different page number than this nine-page reader.
Head and Body: Rounds 1–36
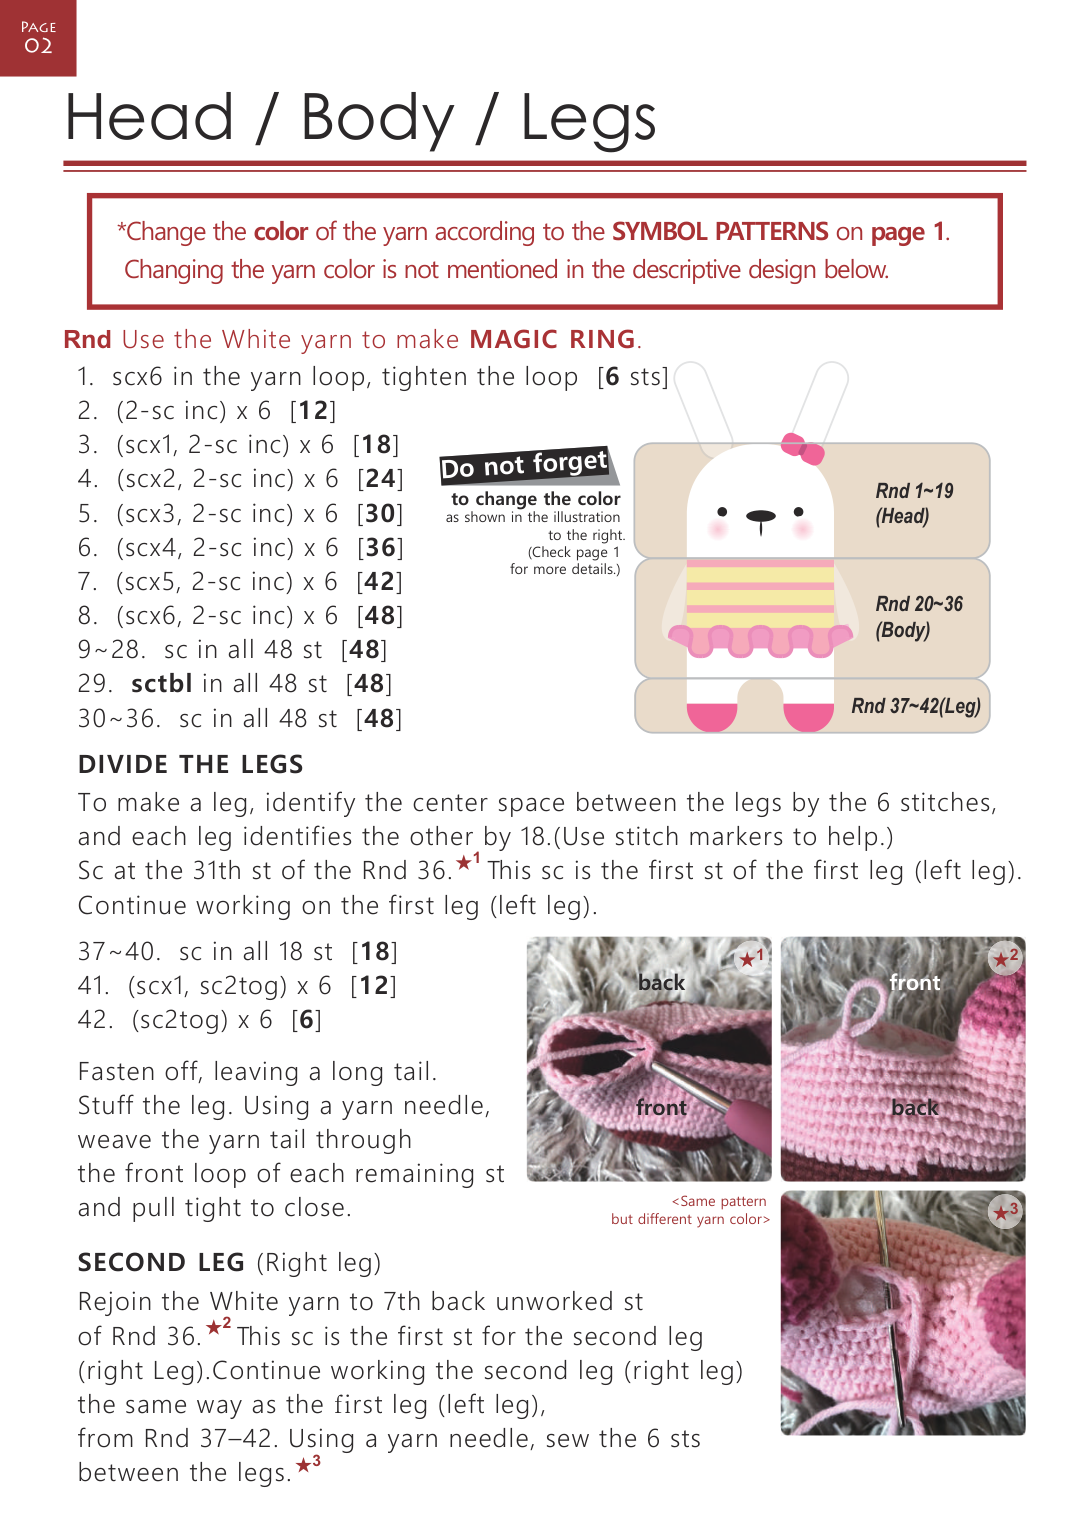
Begin in white with a magic ring. Head rounds are 1–19; body rounds are 20–36. Color changes follow the original chart, not the plain text alone.
| Round | Instructions | Count |
|---|---|---|
| 1 | 6 sc into magic ring; tighten. | 6 |
| 2 | inc × 6 | 12 |
| 3 | (sc, inc) × 6 | 18 |
| 4 | (2 sc, inc) × 6 | 24 |
| 5 | (3 sc, inc) × 6 | 30 |
| 6 | (4 sc, inc) × 6 | 36 |
| 7 | (5 sc, inc) × 6 | 42 |
| 8 | (6 sc, inc) × 6 | 48 |
| 9–28 | sc in all 48 stitches; use chart colors. | 48 |
| 29 | sc through back loop only in all stitches, in white. | 48 |
| 30–36 | sc in all stitches. | 48 |
Round 29 leaves loops available for attaching the skirt. Keep the original chart beside you to distinguish the head, striped section, and white lower body.
Divide and Crochet Both Legs
The original division chart is essential here. The source identifies each leg as 18 stitches and marks a 6-stitch space between the legs. Begin the left leg at stitch 31 of round 36, as shown on PDF pages 3–4. Do not divide the 48 stitches into two equal 24-stitch legs.
| Round | Each leg | Count |
|---|---|---|
| 37–40 | sc in all 18 stitches, following white/hot-pink chart colors. | 18 |
| 41 | (sc, dec) × 6 | 12 |
| 42 | dec × 6 | 6 |
Fasten off with a long tail, stuff the leg, pass the tail through the front loops of the remaining stitches, and pull closed.
For the right leg, the source says to rejoin white yarn at the seventh unworked back stitch of round 36. Repeat rounds 37–42. Sew the six stitches between the legs following the division photos. Compare both front and back reference images rather than guessing the join.
Arms, Skirt, Bow, and Ears
Arms — make 2
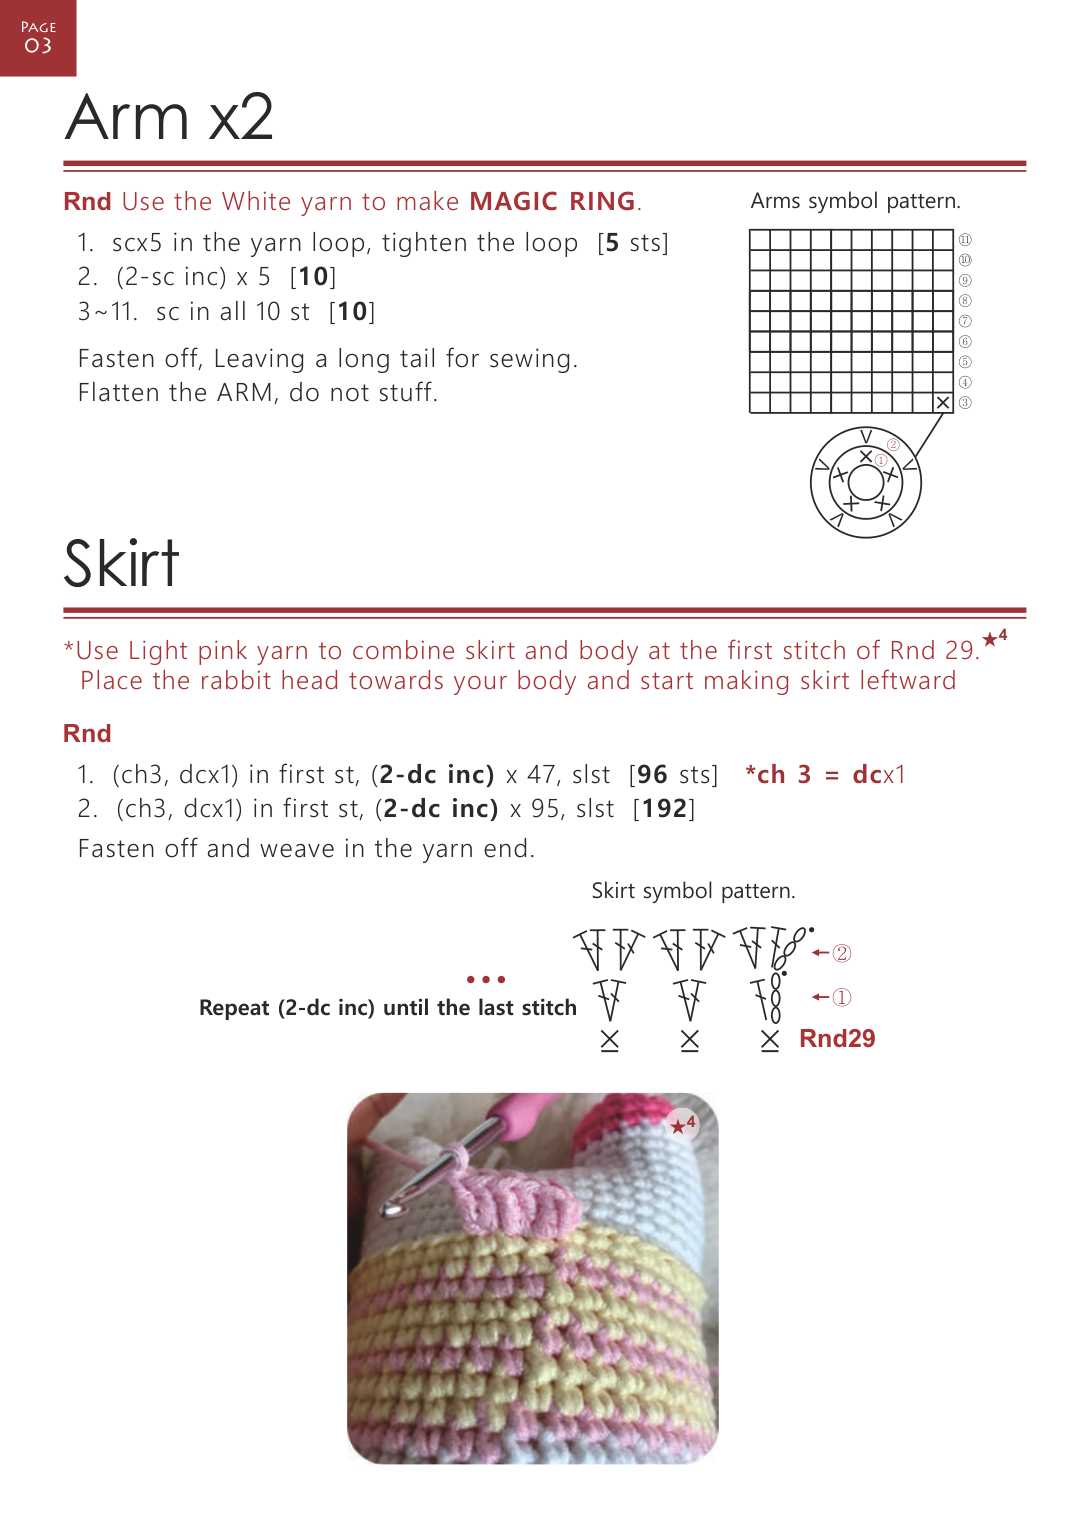
Use white yarn. Round 1: 5 sc in a magic ring (5). Round 2: inc × 5 (10). Rounds 3–11: sc around (10). Leave a sewing tail. Flatten each arm and do not stuff.
Skirt — 2 rounds
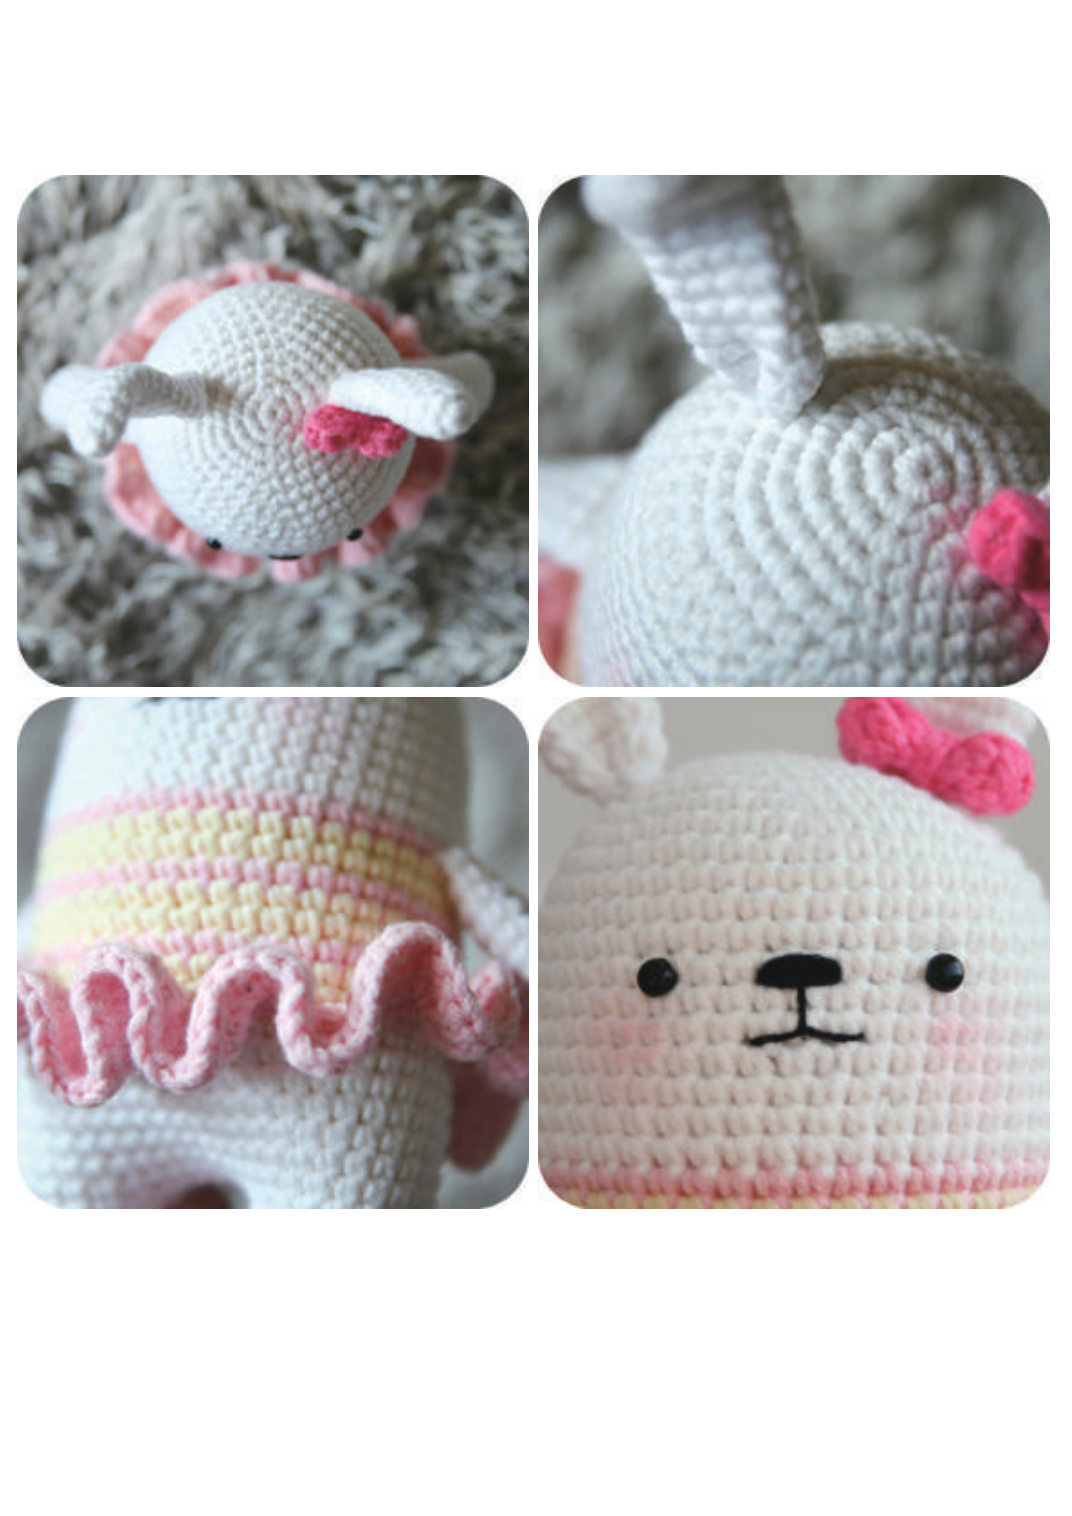
The written source specifies light pink. Attach at the first stitch of body round 29, with the rabbit’s head pointing toward you, and work leftward as illustrated.
- Round 1: (ch 3, dc) in the first stitch, then 2 dc in each of the next 47 stitches; slip stitch to join (96). The starting ch 3 counts as one dc.
- Round 2: (ch 3, dc) in the first stitch, then 2 dc in each of the next 95 stitches; slip stitch to join (192). Fasten off and weave in the end.
The sample skirt shown in the photographs is a brighter pink than the written color choice. Keep the stitch instructions the same when selecting your color.
Bow / ribbon
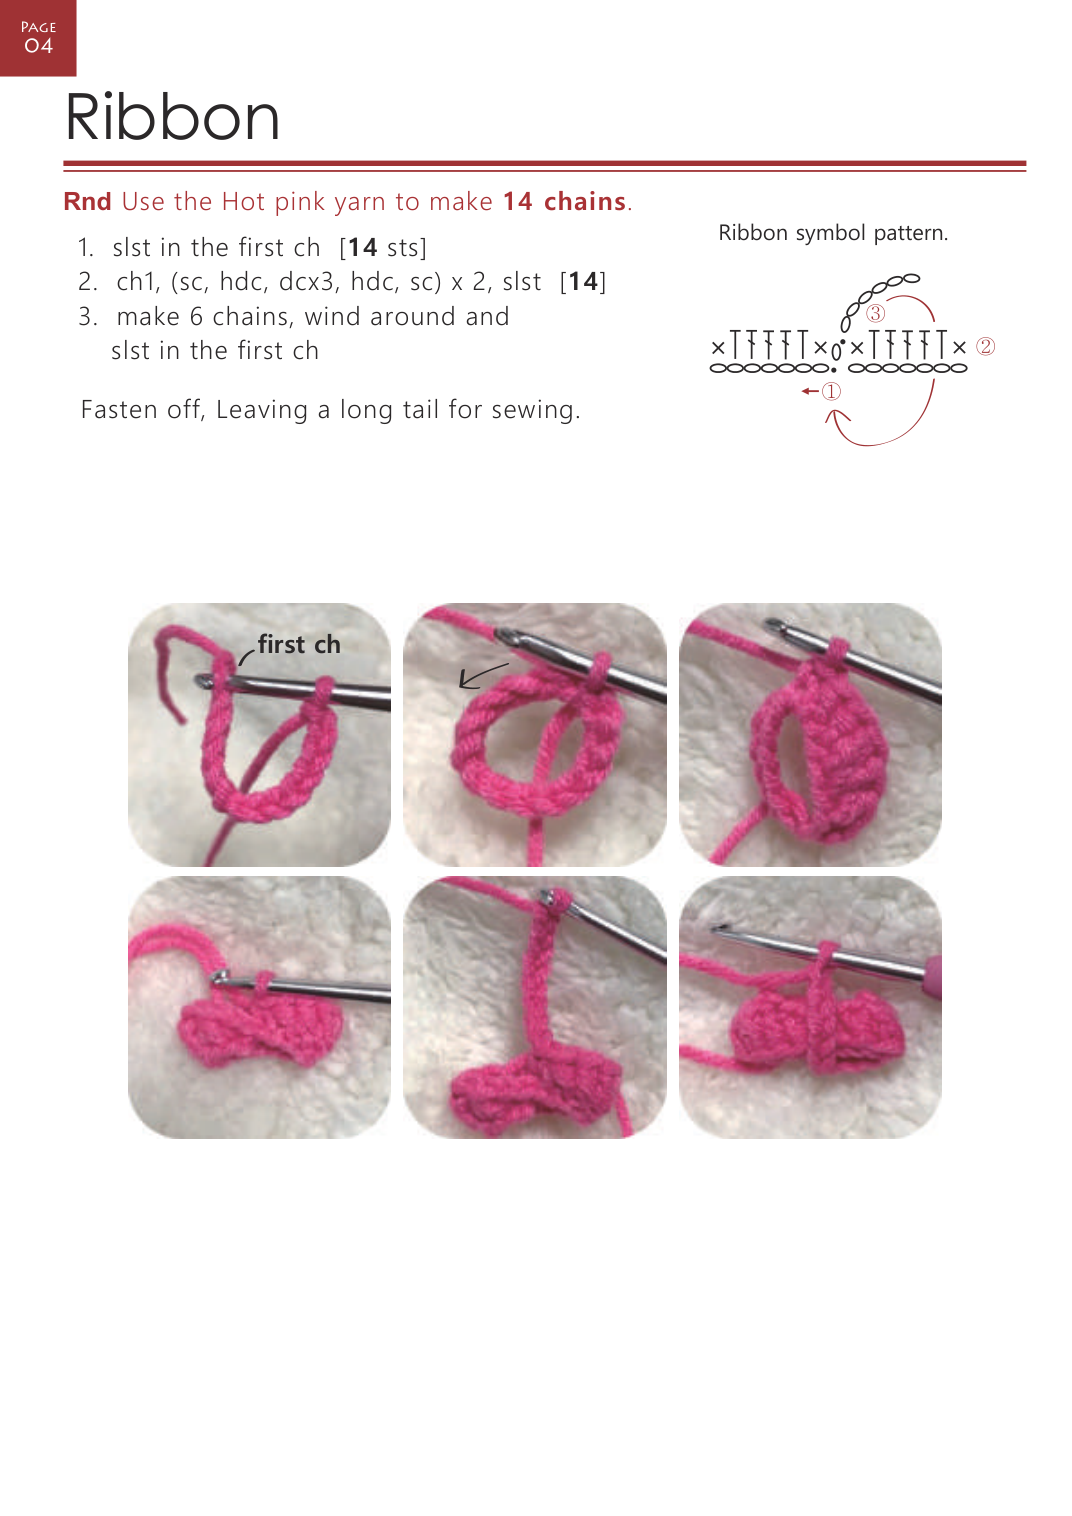
Use hot pink. Chain 14 and slip stitch into the first chain to form a ring. Chain 1; work (sc, hdc, 3 dc, hdc, sc) twice, then slip stitch (14 stitches). Chain 6, wrap the chain around the center as shown, and slip stitch into its first chain. Leave a sewing tail. PDF page 6 shows the complete sequence in six photographs.
Ears — make 2
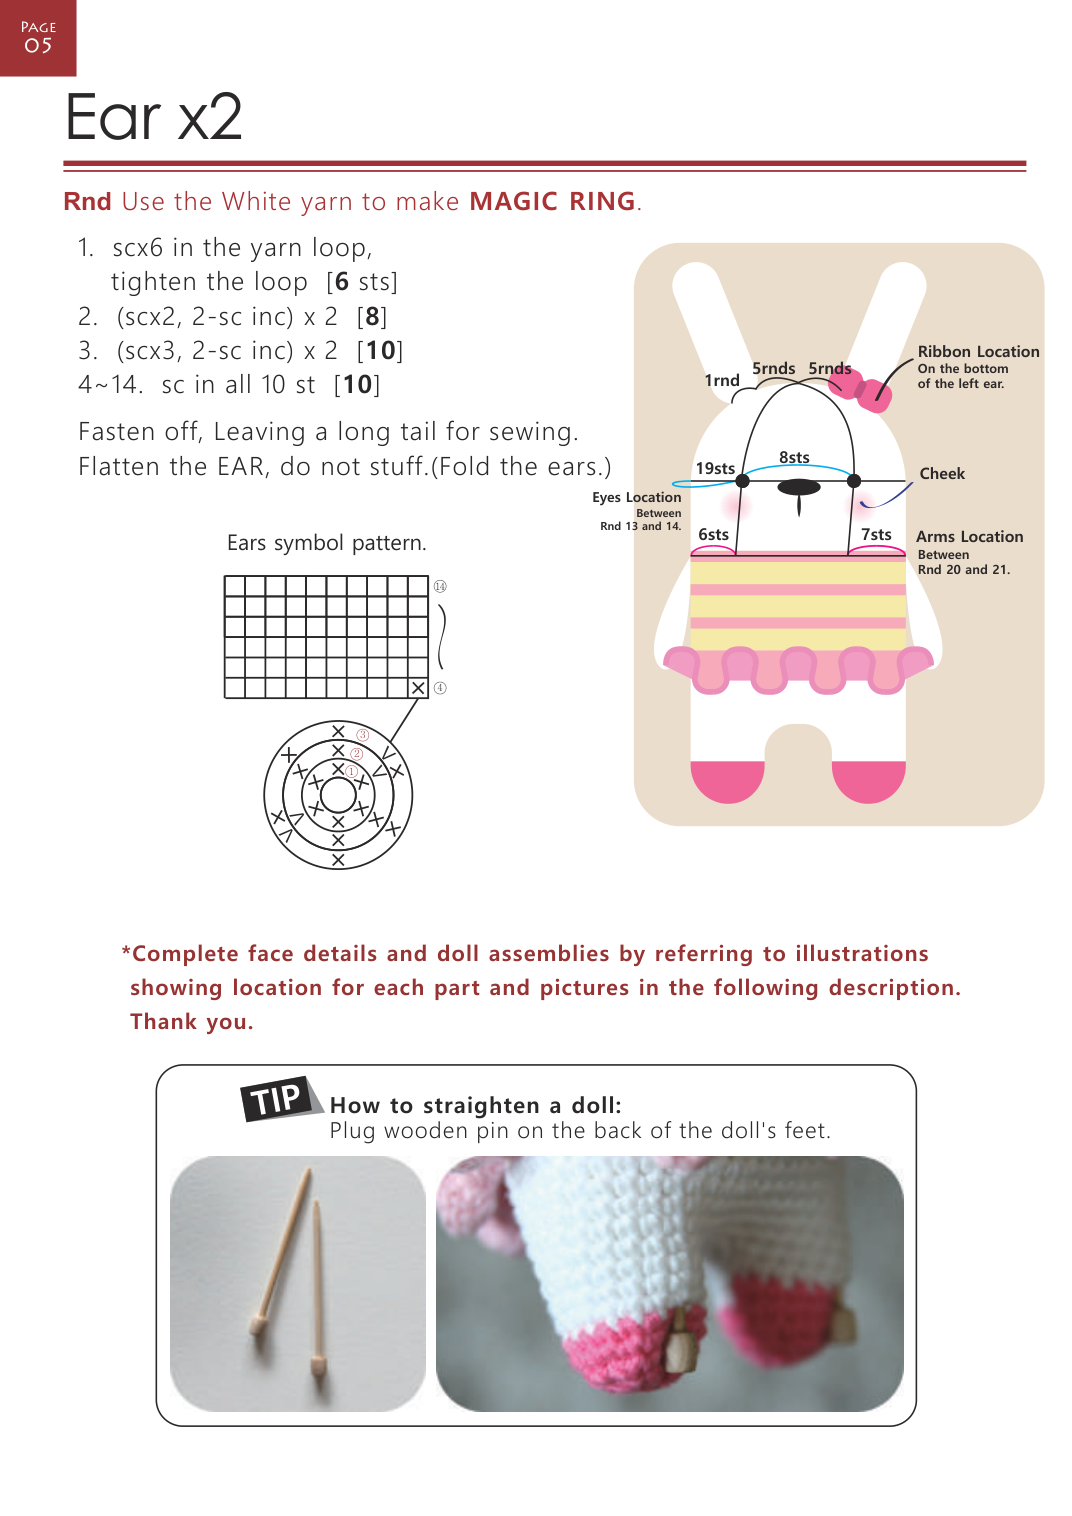
Use white. Round 1: 6 sc in a magic ring (6). Round 2: (2 sc, inc) × 2 (8). Round 3: (3 sc, inc) × 2 (10). Rounds 4–14: sc around (10). Leave sewing tails, flatten, and do not stuff. Fold the ears as shown before attaching.
Assembly and Face Details
For assembly of this mini bunny crochet pattern, use PDF pages 7–9 as the placement references. Attach the arms between rounds 20 and 21, and place the eyes between rounds 13 and 14. The bow is placed at the bottom of the left ear. The source diagram also labels stitch spacing for the eyes, cheeks, and ears; enlarge it for exact positioning.
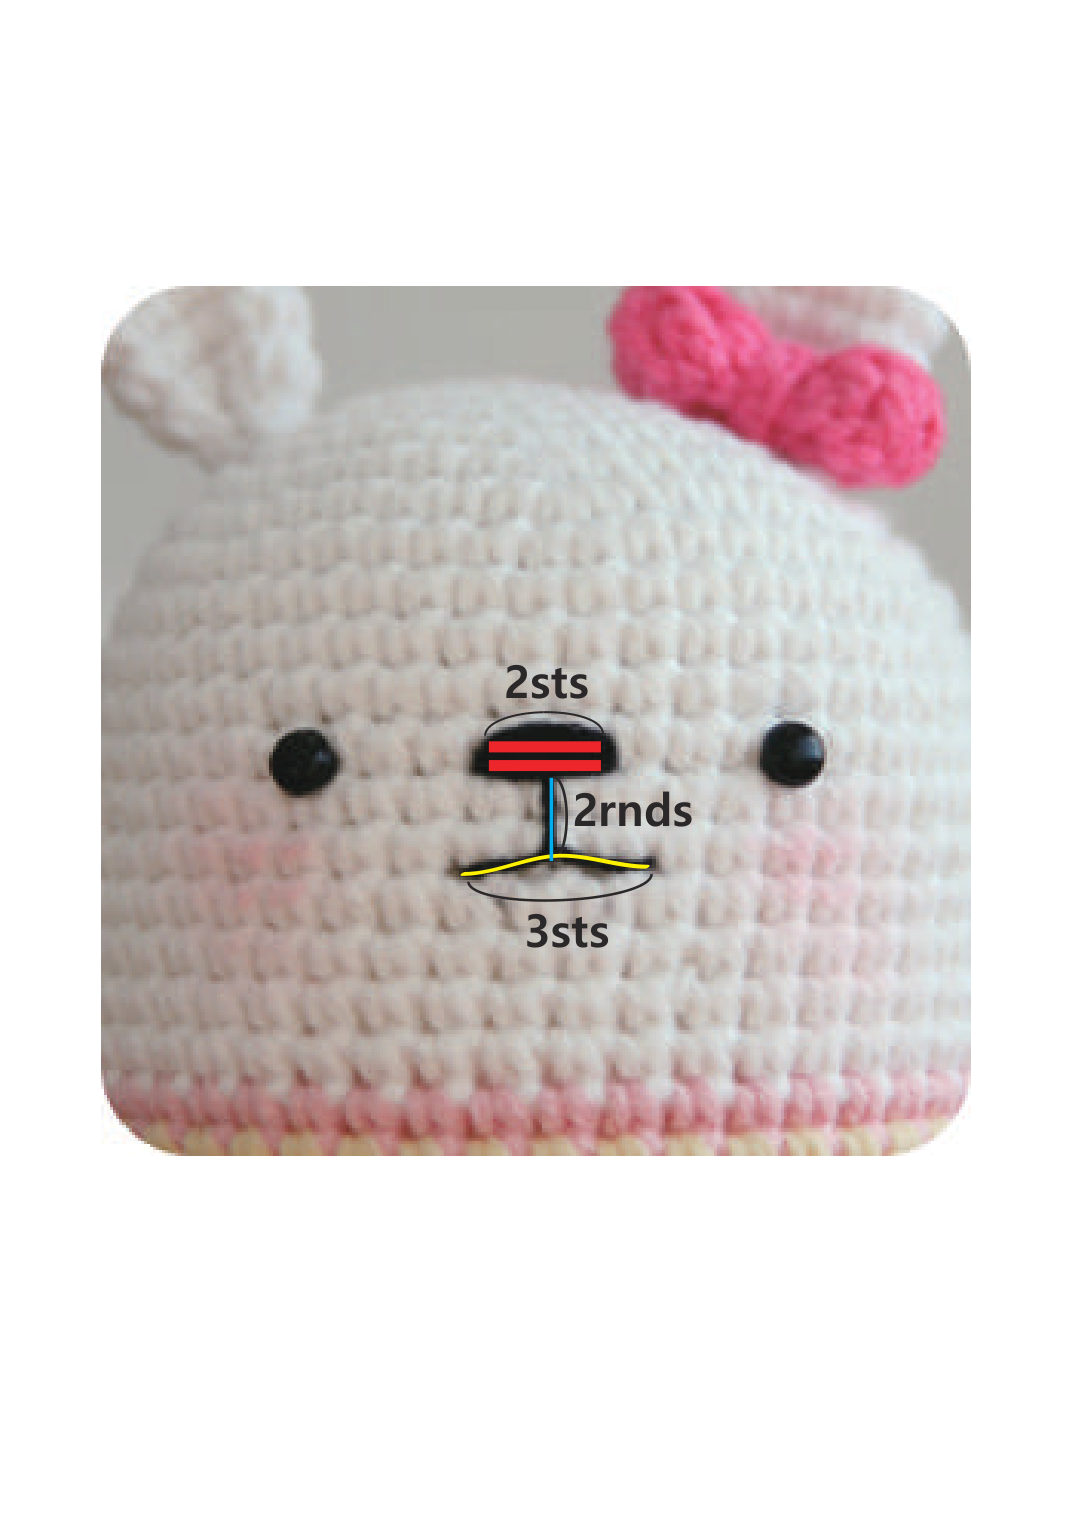
The face close-up labels the nose width as 2 stitches, the center line as 2 rounds, and the lower mouth line as 3 stitches. Use black yarn for the embroidered facial details shown. Check symmetry before securing each end.
Inspect joins, stuffing, and all loose ends before finishing. The PDF includes a wooden-pin standing tip; it is not needed to crochet the bunny and is not part of the materials checklist here.
Mini Bunny Crochet Pattern: Questions and Troubleshooting
Will my bunny be exactly 15 cm tall?
Not necessarily. The source ties that size to fingering yarn and a 3 mm hook while also listing worsted yarn elsewhere. It gives no gauge to resolve that conflict. Your yarn, tension, and hook can change the result.
Can I make the pattern from the written rounds alone?
The written source omits the color changes and refers you to its charts. Keep PDF page 3 available, especially for the striped body and feet. The source reader below includes every page.
Why is my skirt so full?
The source doubles the stitch count twice, from 48 attachment stitches to 96 and then 192. This creates the illustrated ruffle. Remember that ch 3 counts as the first dc.
Should the ears and arms be stuffed?
No. The source specifically says to flatten these parts and leave them unstuffed. The legs are stuffed before closure.
Is a beginner skill level stated?
No skill rating is provided. Review magic rings, increases, decreases, color charts, back-loop stitches, and sewing small pieces before choosing this project.
For another project in the same category, try the tiny crochet frog photo tutorial, or browse Amigurumi & Toys.
Mini Bunny Crochet Pattern: Original Page Reader
Read every original chart and photograph in order. The reader saves your current page in this browser. Select an image to open its full-size version.
All Original Charts and Photos
These are page renders of the supplied PDF, retaining its diagrams, text, and photographs. Select any page for the full-size image. The cover is an illustration; the later pages contain the original finished-project and construction photographs.
Leave a Reply