
Apricot fox crochet pattern: Apricot the Little Fox is an approximately 16 cm amigurumi worked in fine yarn with a 2.5 mm hook. This pattern uses a color-worked muzzle, black-tipped ears and paws, and a white-tipped tail. Work in continuous spirals unless a section says otherwise, and mark the start of every round.

Materials and US abbreviations
Size 2 fine yarn in orange, white and black (the original specifies a 50 g/160 m cotton/acrylic blend); 2.5 mm crochet hook; two 8 mm safety eyes; stuffing; pins; tapestry needle; scissors and stitch marker. Approximate finished height: 16 cm. Eye decoration may use white and fine brown yarn, and the nose uses fine black thread.
MR magic ring; ch chain; sc single crochet; hdc half double crochet; dc double crochet; inc two sc in one stitch; dec decrease; sl st slip stitch; BLO/FLO back/front loop only. Change color during the last step of the preceding stitch.
Head — start with white
- R1. 6 sc in MR (6).
- R2. Inc, sc; change to orange: inc, sc; change to white: inc, sc (9).
- R3. 2 sc, {sc, change to orange: sc in the same stitch as an increase with each stitch in a different color}, 2 sc, inc, sc; change to white: sc, inc (12).
- R4. Sc, inc, sc; change to orange: [inc, sc] × 3, {sc, change to white: sc in the same stitch}, sc, inc (18).
- R5. 4 sc; change to orange: 10 sc; change to white: 4 sc (18).
- R6. Sc, inc, 2 sc; change to orange: [inc, 2 sc] × 3, inc; change to white: 2 sc, inc, sc (24).
- R7. 5 sc; change to orange: 14 sc; change to white: 5 sc (24).
- R8. 4 sc, inc; change to orange: [2 sc, inc] × 4, 2 sc; change to white: inc, 4 sc (30).
- R9. 6 sc; change to orange: 18 sc; change to white: 6 sc (30).
- R10. 5 sc, inc; change to orange: [3 sc, inc] × 4, 2 sc; change to white: inc, 5 sc (36).
- R11. 6 sc, inc; change to orange: 3 sc, [inc, 4 sc] × 3, inc, 3 sc; change to white: inc, 6 sc (42).
- R12. 7 sc, inc; change to orange: 4 sc, [inc, 5 sc] × 3, inc, 3 sc; change to white: inc, 7 sc (48).
- R13. 9 sc; change to orange: 30 sc; change to white: 9 sc (48).
- R14. 8 sc, inc; change to orange: inc, 7 sc, inc, 12 sc, inc, 7 sc, inc; change to white: inc, 8 sc (54).
- R15. 9 sc, inc; change to orange: [inc, 10 sc] × 3, inc; change to white: inc, 9 sc (60).
- R16. 11 sc; change to orange: 38 sc; change to white: 11 sc (60).
- R17. 10 sc; change to orange: 2 inc, 36 sc, 2 inc; change to white: 10 sc (64).
- R18. 7 sc; change to orange: 50 sc; change to white: 7 sc (64).
- R19. 4 sc; change to orange: 56 sc; change to white: 4 sc (64).
- R20. Change to orange: 64 sc. Fasten off and weave in the white yarn (64).
- R21. 10 sc, 2 dec, 36 sc, 2 dec, 10 sc (60).
- R22. 10 sc, dec, 7 sc, dec, [8 sc, dec] × 2, 7 sc, dec, 8 sc, dec (54).
- R23. 3 sc, dec, [7 sc, dec] × 5, 4 sc (48).
- R24. [6 sc, dec] × 6 (42).
- R25. 2 sc, dec, [5 sc, dec] × 5, 3 sc (36).
- R26. [4 sc, dec] × 6 (30).
- R27. [3 sc, dec] × 6 (24).
- R28. [2 sc, dec] × 6 (18).
- R29. [sc, dec] × 6 (12).
- R30. 6 dec (6).
Place the 8 mm eyes between Rounds 10 and 11, 15 stitches apart when counted on Round 10. Stuff as you go. After the last round, thread through the six front loops to close the opening.
Face details
For the eye indents, use a yarn tail matching the head. Pass the needle through six marked points in order: in at 1, out at 2, in at 3, out at 4, in at 5, out at 6. Pull both ends to form the indents, knot securely, and weave in. Decorate around the eyes with white yarn and add thin brown embroidered eyelashes if desired. Mark the nose area with pins between Rounds 2 and 3. Start from the lower marked point and embroider with thin black thread until the nose area is covered; add the vertical mouth line.
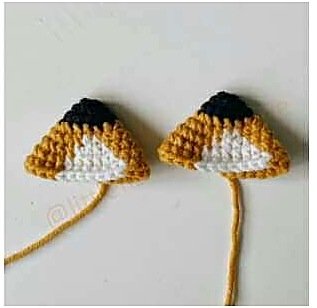
Ears — make two, start with black
- R1. 6 sc in MR (6).
- R2. [sc, inc] × 3 (9).
- R3. [2 sc, inc] × 3 (12). Change to orange; cut and weave in black.
- R4. 2 sc, 2 inc, 4 sc, 2 inc, 2 sc (16).
- R5. 3 sc, 2 inc, 2 sc; change to white: 2 sc; change to orange: 2 sc, 2 inc, 3 sc (20).
- R6. 4 sc, 2 inc, 2 sc; change to white: 4 sc; change to orange: 2 sc, 2 inc, 4 sc (24).
- R7. 5 sc, inc, 3 sc; change to white: 6 sc; change to orange: 3 sc, inc, 5 sc (26).
- R8. 6 sc, inc, 3 sc; change to white: 7 sc; change to orange: 2 sc, inc, 6 sc (28).
Cut and weave in white, leaving a long orange sewing tail. Pin the top ear positions 10 stitches apart between head Rounds 21 and 22, with lower points between Rounds 17 and 18. Sew along the pinned edges, drawing the orange sewing yarn tight where the ear is white.
Body — start with orange
- R1. 8 sc in MR (8).
- R2. 8 inc (16).
- R3. [sc, inc] × 8 (24).
- R4. [3 sc, inc] × 6 (30).
- R5. [4 sc, inc] × 6 (36).
- R6. [5 sc, inc] × 6 (42).
- R7. [6 sc, inc] × 6 (48).
- R8–10. 48 sc (48).
- R11. 2 sc, dec, 3 sc, dec, 30 sc, dec, 3 sc, dec, 2 sc (44).
- R12. 2 sc, dec, 3 sc, dec, 26 sc, dec, 3 sc, dec, 2 sc (40).
- R13. 40 sc (40).
- R14. Sc, dec, 2 sc, dec, 26 sc, dec, 2 sc, dec, sc (36).
- R15. 3 sc, dec, 26 sc, dec, 3 sc (34).
- R16. 17 sc; change to white: 2 sc; change to orange: 15 sc (34).
- R17. 4 sc, dec, 10 sc; change to white: 4 sc; change to orange: 10 sc, dec, 2 sc (32).
- R18. 3 sc, dec, 10 sc; change to white: 4 sc; change to orange: 10 sc, dec, sc (30).
- R19. 13 sc; change to white: 6 sc; change to orange: 11 sc (30).
- R20. 2 sc, dec, 3 sc, dec, 4 sc; change to white: 6 sc; change to orange: 4 sc, dec, 3 sc, dec (26).
- R21. 10 sc; change to white: 8 sc; change to orange: 8 sc (26).
- R22. 2 sc, dec, 6 sc; change to white: 8 sc; change to orange: 6 sc, dec (24).
- R23. 2 sc, dec, 4 sc; change to white: 10 sc (do not break white); change to orange: 4 sc, dec (22).
Fasten off, keeping a long white tail to sew the head. Stuff the body firmly. Pin the join points on the head and sew the body to the head; the head may face at an angle.

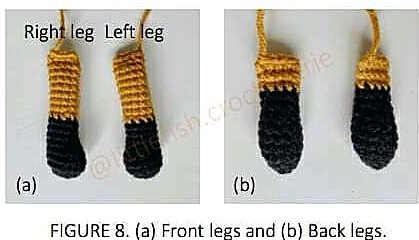
Front legs — make two, start with black
- R1. 8 sc in MR (8).
- R2. 8 inc (16).
- R3–4. 16 sc (16).
- R5. 5 sc, dec, 2 sc, dec, 5 sc (14).
- R6. 5 sc, 2 dec, 5 sc (12).
- R7. 5 sc, dec, 5 sc (11).
- R8–9. 11 sc (11). Change to orange; cut and weave in black.
- R10–17. 11 sc (11).
- R18, left leg. Dec, 3 sc, dec, 2 sc (9).
- R18, right leg. Dec, 3 sc, dec (9).
Made these front legs? We would love to hear how Round 18 worked for you. Tell us your stitch count for each leg, whether anything felt unclear, and any adjustment you made. Your experience can help other makers follow the pattern.
Stuff Rounds 1–15 firmly and the remainder loosely. Flatten the opening and crochet 4 sc through both layers; leave a sewing tail. Attach the front legs between body Rounds 19 and 20, using the original placement photos.
Back legs — make two, start with black
- R1. 6 sc in MR (6).
- R2. 2 sc, 3 inc, sc (9).
- R3. 2 sc, inc, 3 sc, inc, 2 sc (11).
- R4–6. 11 sc (11).
- R7. 5 sc, dec, 4 sc (10).
- R8. 4 sc, dec, 4 sc (9).
- R9. 9 sc (9). Change to orange; cut and weave in black.
- R10–11. 9 sc (9).
Stuff Rounds 1–8, leaving the rest unstuffed. Flatten each opening and work 4 sc through both layers. Leave sewing tails and sew both back legs to the bottom of the body.
Tail — start with white
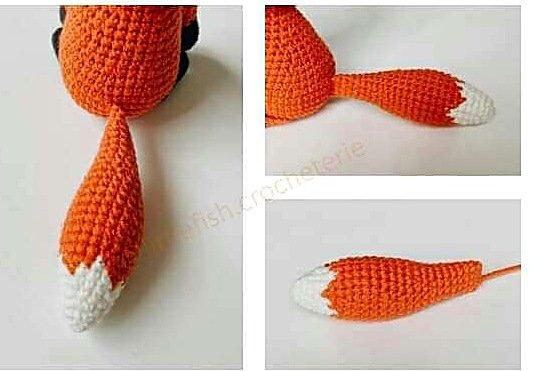
- R1. 6 sc in MR (6).
- R2. [sc, inc] × 3 (9).
- R3. [2 sc, inc] × 3 (12).
- R4. 12 sc (12).
- R5. [2 sc, inc] × 4 (16).
- R6. [White: 3 sc; change to orange: sc] × 4 (16).
- R7. [Orange: sc; change to white: sc; change to orange: sc, inc] × 4 (20).
- R8. 20 sc (20).
- R9. [9 sc, inc] × 2 (22).
- R10–12. 22 sc (22).
- R13. [9 sc, dec] × 2 (20).
- R14. 20 sc (20).
- R15. [8 sc, dec] × 2 (18).
- R16. 18 sc (18).
- R17. [4 sc, dec] × 3 (15).
- R18. 15 sc (15).
- R19. [3 sc, dec] × 3 (12).
- R20–21. 12 sc (12).
- R22. [4 sc, dec] × 2 (10).
- R23. 10 sc (10).
- R24. 8 sc, dec (9).
- R25. 9 sc (9).
Stuff the tail firmly. Flatten the opening and crochet 4 sc through both layers. Fasten off with a long sewing tail and sew it to the body. If desired, secure the tail to the side of the body. The source notes that its optional side-attachment example depicts an earlier tail version, rather than the tail described above.
Optional scarf
Ch 5. Starting in the second chain from the hook, work 4 sc, ch 1 and turn. Make four rows in green and four in white, repeating the colors until the scarf reaches the desired length.
Keep a stitch marker in place for the spiral rounds and compare your color transitions with the original project photos. If you make Apricot, share your result and let us know which parts were clear or needed a closer look.
Leave a Reply