
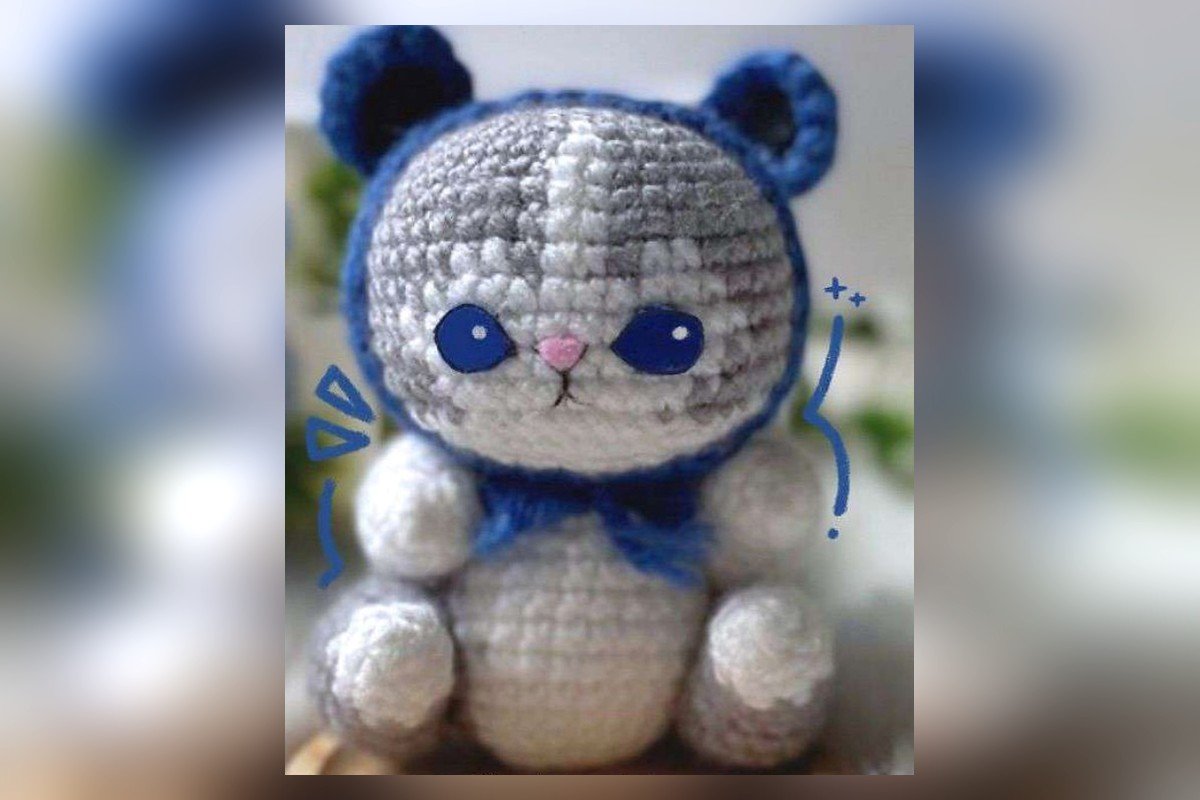
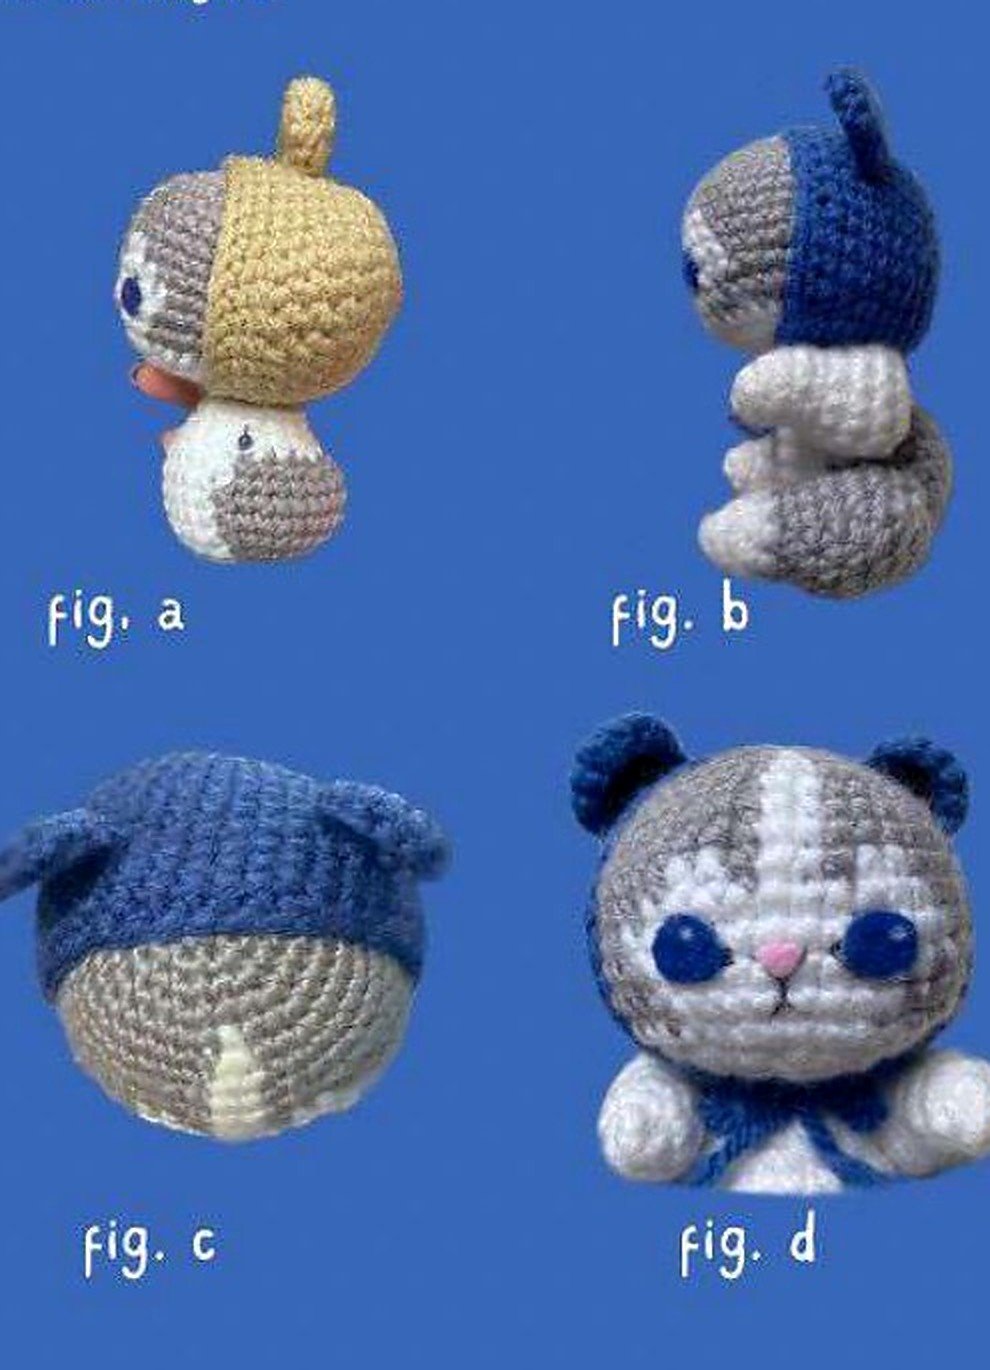
Frog hood cat crochet pattern: Make a gray-and-white amigurumi kitty with a separate hood and round froggy ears. The face uses felt eyes and a pink nose. This project is worked in continuous rounds using US crochet terms. Keep a stitch marker at the start of each round, and use the source color guide pictured below when changing between gray and white.

Materials and US abbreviations
4-ply acrylic yarn in gray, white and dark blue (or another color for the hood); 3.5 mm crochet hook; dark blue and pink felt; black sewing thread; stuffing; darning and sewing needle; glue; scissors. The hood color is your choice.
MR = magic ring; sc = single crochet; inc = increase (two sc in one stitch); dec = decrease; sl st = slip stitch; ch = chain; FO = fasten off. Brackets followed by × tell you how many times to repeat a sequence.
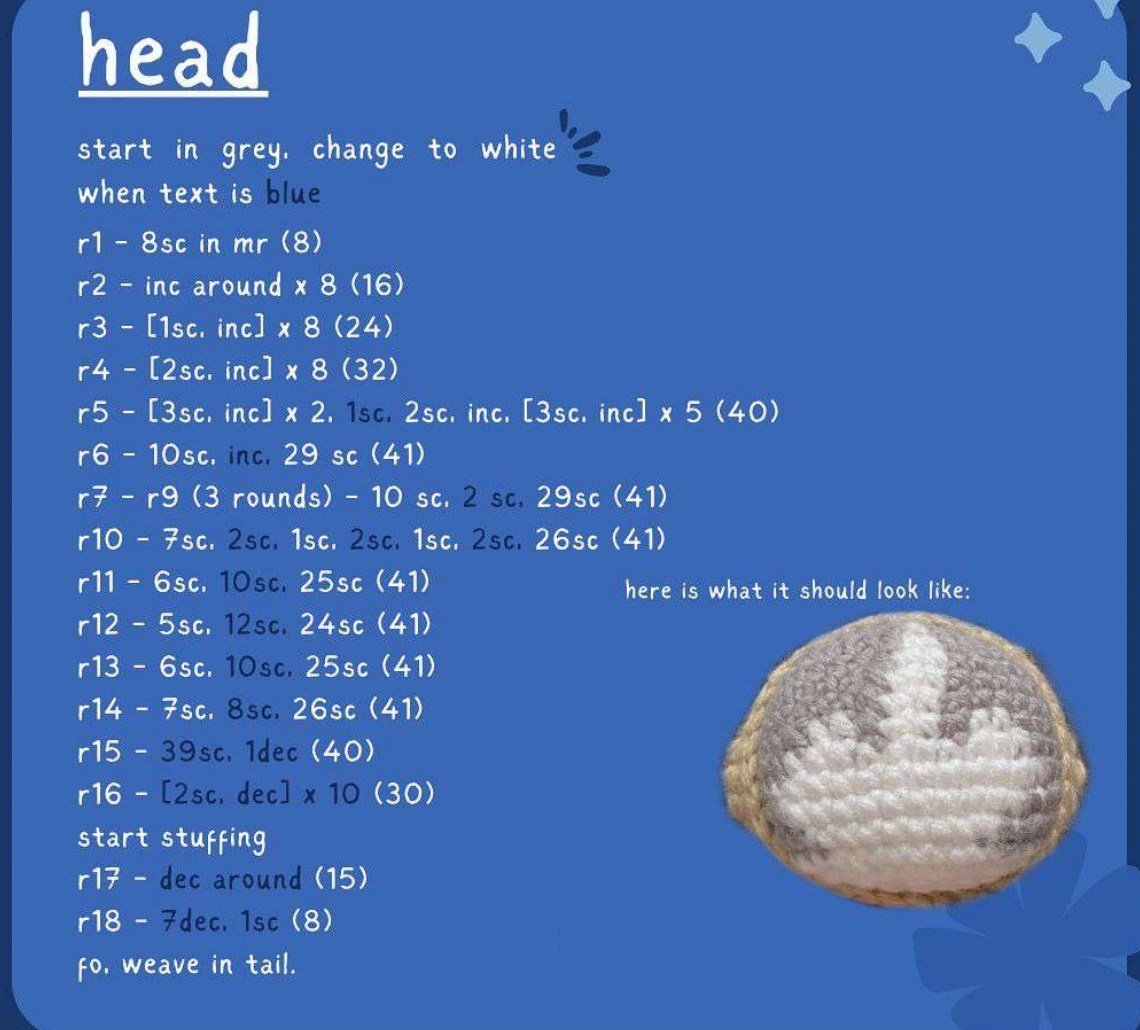
Head
Start in gray and change to white where the original colored text indicates. The round guide is included immediately after these written instructions to keep the color placement visible.
- R1. 8 sc in MR (8).
- R2. Inc × 8 (16).
- R3. [1 sc, inc] × 8 (24).
- R4. [2 sc, inc] × 8 (32).
- R5. [3 sc, inc] × 2, 1 sc, 2 sc, inc, [3 sc, inc] × 5 (40).
- R6. 10 sc, inc, 29 sc (41).
- R7–9. 10 sc, 2 sc, 29 sc (41 each round).
- R10. 7 sc, 2 sc, 1 sc, 2 sc, 1 sc, 2 sc, 26 sc (41).
- R11. 6 sc, 10 sc, 25 sc (41).
- R12. 5 sc, 12 sc, 24 sc (41).
- R13. 6 sc, 10 sc, 25 sc (41).
- R14. 7 sc, 8 sc, 26 sc (41).
- R15. 39 sc, 1 dec (40).
- R16. [2 sc, dec] × 10 (30). Stuff the head.
- R17. Dec around (15).
- R18. 7 dec, 1 sc (8). FO and weave in the tail.

Body
Start in gray and change to white following the original colored round guide.
- R1. 8 sc in MR (8).
- R2. Inc × 8 (16).
- R3. [1 sc, inc] × 3, [1 sc, inc] × 5 (24).
- R4. 9 sc, [1 sc, inc] × 7, inc (32).
- R5–7. 9 sc, 23 sc (32 each round).
- R8. 10 sc, 21 sc, 1 sc (32).
- R9. 10 sc, 2 sc, 8 dec, 3 sc, 1 sc (24).
- R10. [1 sc, dec] × 8 (16).
- R11–12. Sc around (16 each round). Stuff, FO and leave a long tail for sewing.


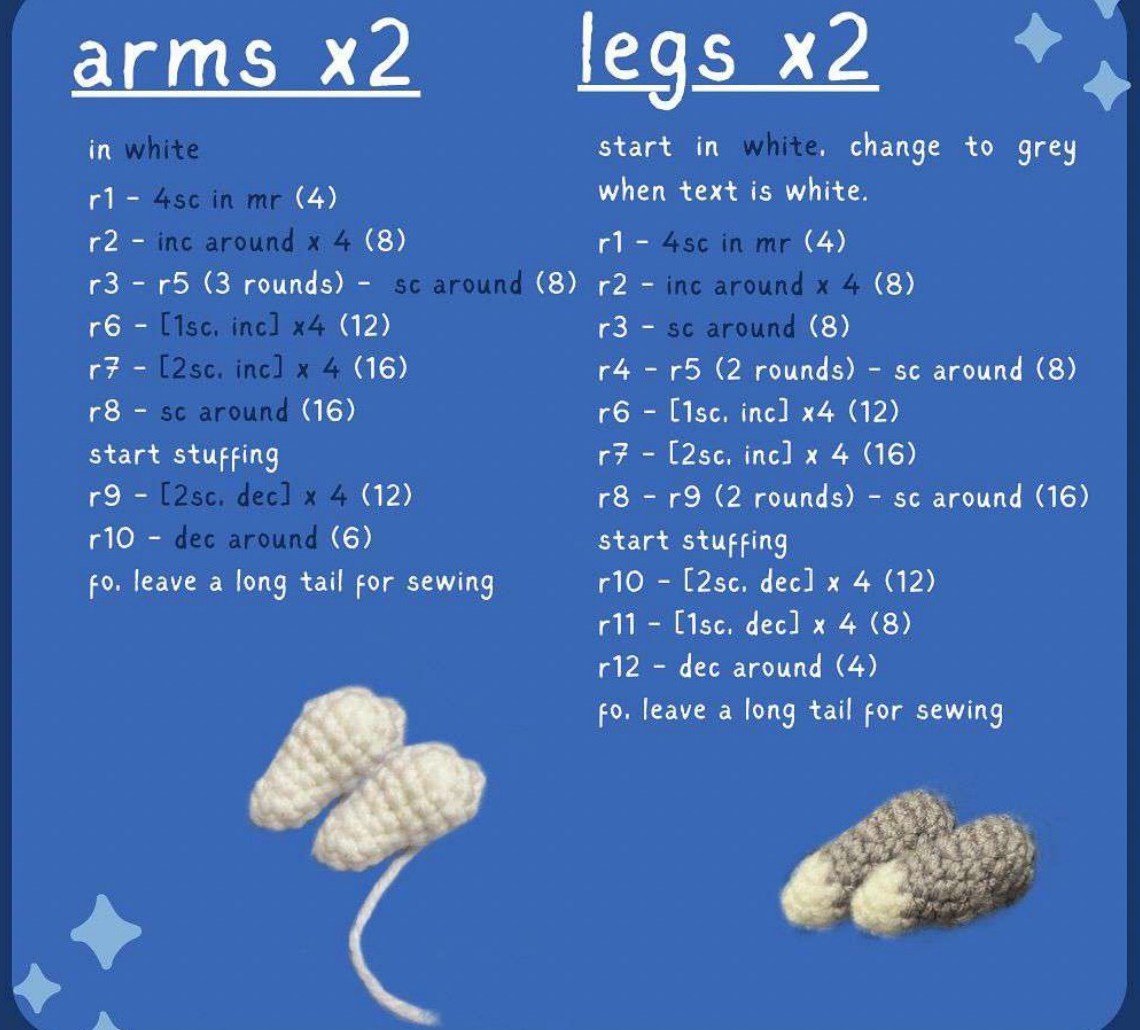
Arms — make two
Work in white.
- R1. 4 sc in MR (4).
- R2. Inc × 4 (8).
- R3–5. Sc around (8 each round).
- R6. [1 sc, inc] × 4 (12).
- R7. [2 sc, inc] × 4 (16).
- R8. Sc around (16). Start stuffing.
- R9. [2 sc, dec] × 4 (12).
- R10. Dec around (6). FO and leave a long sewing tail.
Legs — make two
Start in white and change to gray as indicated in the original color-coded instruction image.
- R1. 4 sc in MR (4).
- R2. Inc × 4 (8).
- R3. Sc around (8).
- R4–5. Sc around (8 each round).
- R6. [1 sc, inc] × 4 (12).
- R7. [2 sc, inc] × 4 (16).
- R8–9. Sc around (16 each round). Start stuffing.
- R10. [2 sc, dec] × 4 (12).
- R11. [1 sc, dec] × 4 (8).
- R12. Dec around (4). FO and leave a long sewing tail.

Hood
Use the hood color of your choice. The sample uses dark blue. The original pattern allows more or fewer straight rounds depending on your yarn, and places the head into the hood around Round 12.
- R1. 6 sc in MR (6).
- R2. Inc × 6 (12).
- R3. [1 sc, inc] × 6 (18).
- R4. [1 sc, inc, 1 sc] × 6 (24).
- R5. [3 sc, inc] × 6 (30).
- R6. [4 sc, inc] × 6 (36).
- R7–14. Sc around for 8 rounds (36 each round). Insert the head into the hood around R12.
- R15. [4 sc, dec] × 6 (30). Sl st, FO and weave in the tail.
Froggy ears — make two
- R1. 6 sc in MR (6).
- R2. Inc × 6 (12).
- R3. Sc around (12). Sl st, FO and leave a long sewing tail.

Face and assembly
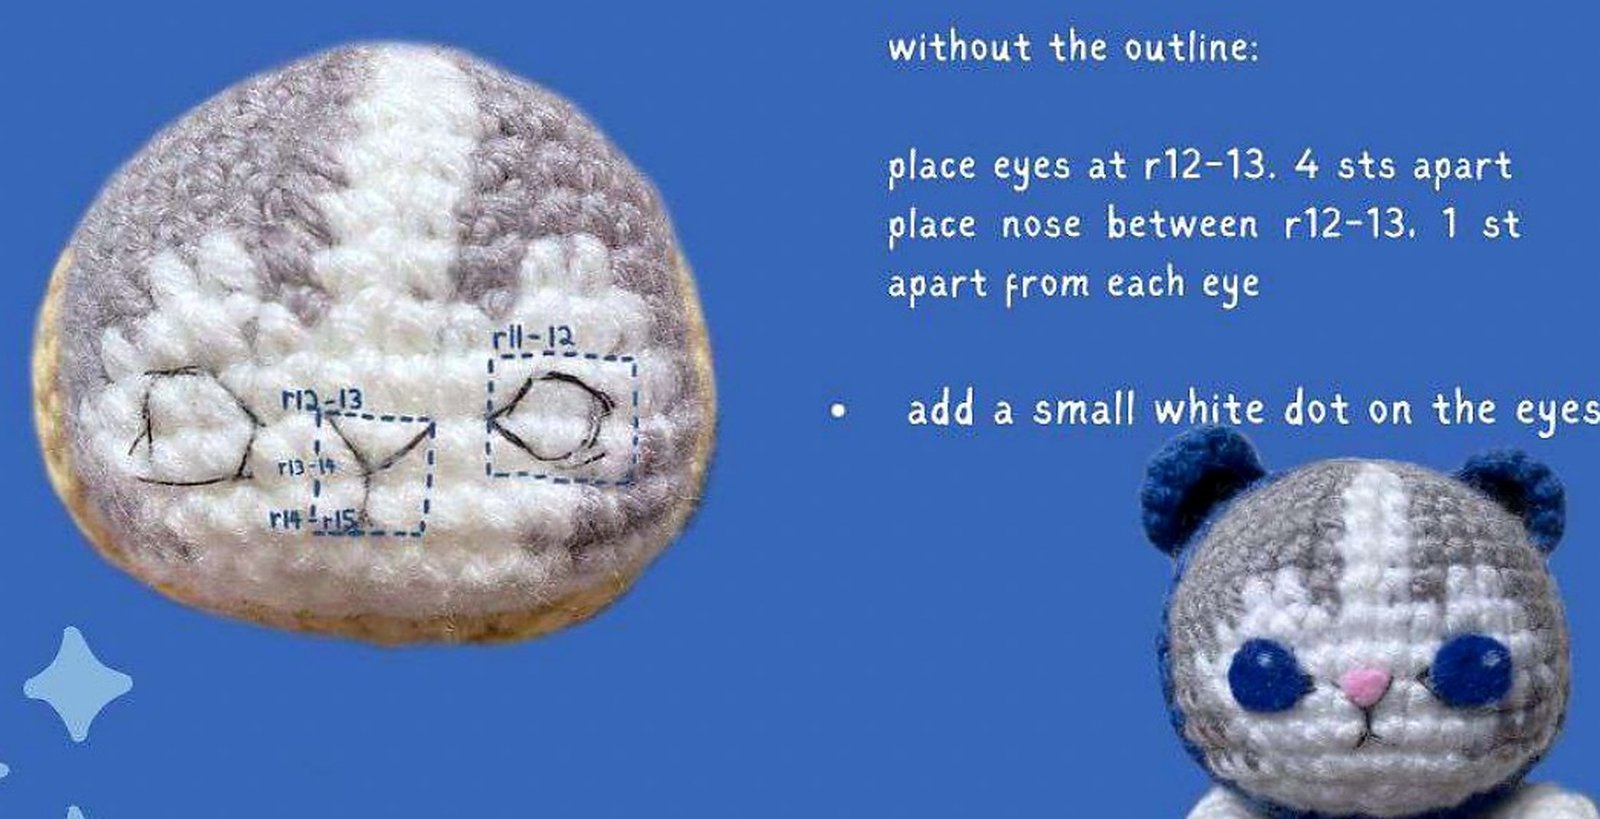
Cut two eyes from dark blue felt and a nose from pink felt. Add a black outline with black sewing thread, and glue the felt pieces in place. The original pattern adds a small white dot to each eye. Position the eyes between head Rounds 12 and 13, four stitches apart. Place the nose between Rounds 12 and 13, one stitch from each eye. Use the face photo to check the placement.
- Insert the head into the hood.
- Sew the head to the body.
- Sew the arms to the body at body Rounds 10–12, across from each other.
- Sew the legs to the body at body Rounds 4–7, below the arms.
- Sew the froggy ears to the hood at hood Round 11, seven visible stitches apart.
- Add a bow beneath the head if you like.
Have you made this kitty or changed the hood color or face? Share how the rounds worked for you, whether any part needed a closer look, and any adjustment you made. Your experience can help the next maker.
Leave a Reply