
Pansy Crochet Pattern
This pansy crochet pattern creates a small four-petal flower with a sunny yellow center, deep violet shaping, and a soft lilac outer edge. The complete guide uses clear American crochet terminology, the original project photographs, exact color placement, a stitch chart, and an interactive reader.
Start step reader
Before you start
The flower is crocheted from the center outward in three colors. Round 1 forms four yellow petal foundations. Round 2 adds the dark violet middle layer, and Round 3 creates the pale lilac outline. Work with steady tension so each petal remains similar in size.
Important notation: the source legend uses “2 dc together” to mean two double crochets worked into the same stitch. In this guide that action is written as a double-crochet increase, not a decrease.
Materials and stitch key
- Size 8 cotton yarn in yellow
- Size 8 cotton yarn in violet
- Size 8 cotton yarn in lilac
- 1.9 mm crochet hook, or a size that produces firm fabric
- 0.6 mm craft wire for the stem
- Yarn needle, scissors, and wire cutters
| Abbreviation | US term |
|---|---|
| ch | chain |
| sl st | slip stitch |
| sc | single crochet |
| dc | double crochet |
| dc inc | 2 double crochets in one stitch |
| MR | magic ring |
The color changes make this pansy crochet pattern easy to check one round at a time.
Round 1: yellow petal foundations
With yellow yarn, make a magic ring. Work the following sequence into the ring: 1 sc, chain 3, 3 dc, chain 3. Repeat the full sequence four times to create four petal foundations.
Pull the loose yarn end carefully to tighten the center. Fasten off the yellow yarn. Before continuing, spread the four sections evenly around the center so the flower does not lean to one side.
Round 2: violet middle layer
Join violet yarn at the center. For each petal, work 1 sc into the center, 2 sc along the first chain-3 space, 1 dc, 1 dc increase, 1 dc, then 2 sc along the second chain-3 space. Repeat this sequence around all four petals and fasten off.
The violet stitches should frame the yellow center while leaving the yellow points visible. Count each petal separately instead of trying to count the entire round at once.
Round 3: lilac outer edge
Join lilac yarn at the starting point shown on the chart. Work the following sequence along the lilac outline shown on the chart:
Work the four double-crochet increases in each group into four successive stitches, following the chart. This makes the rounded pansy silhouette and preserves the two larger upper petals and two smaller lower petals shown in the original photograph.
Original pansy stitch chart
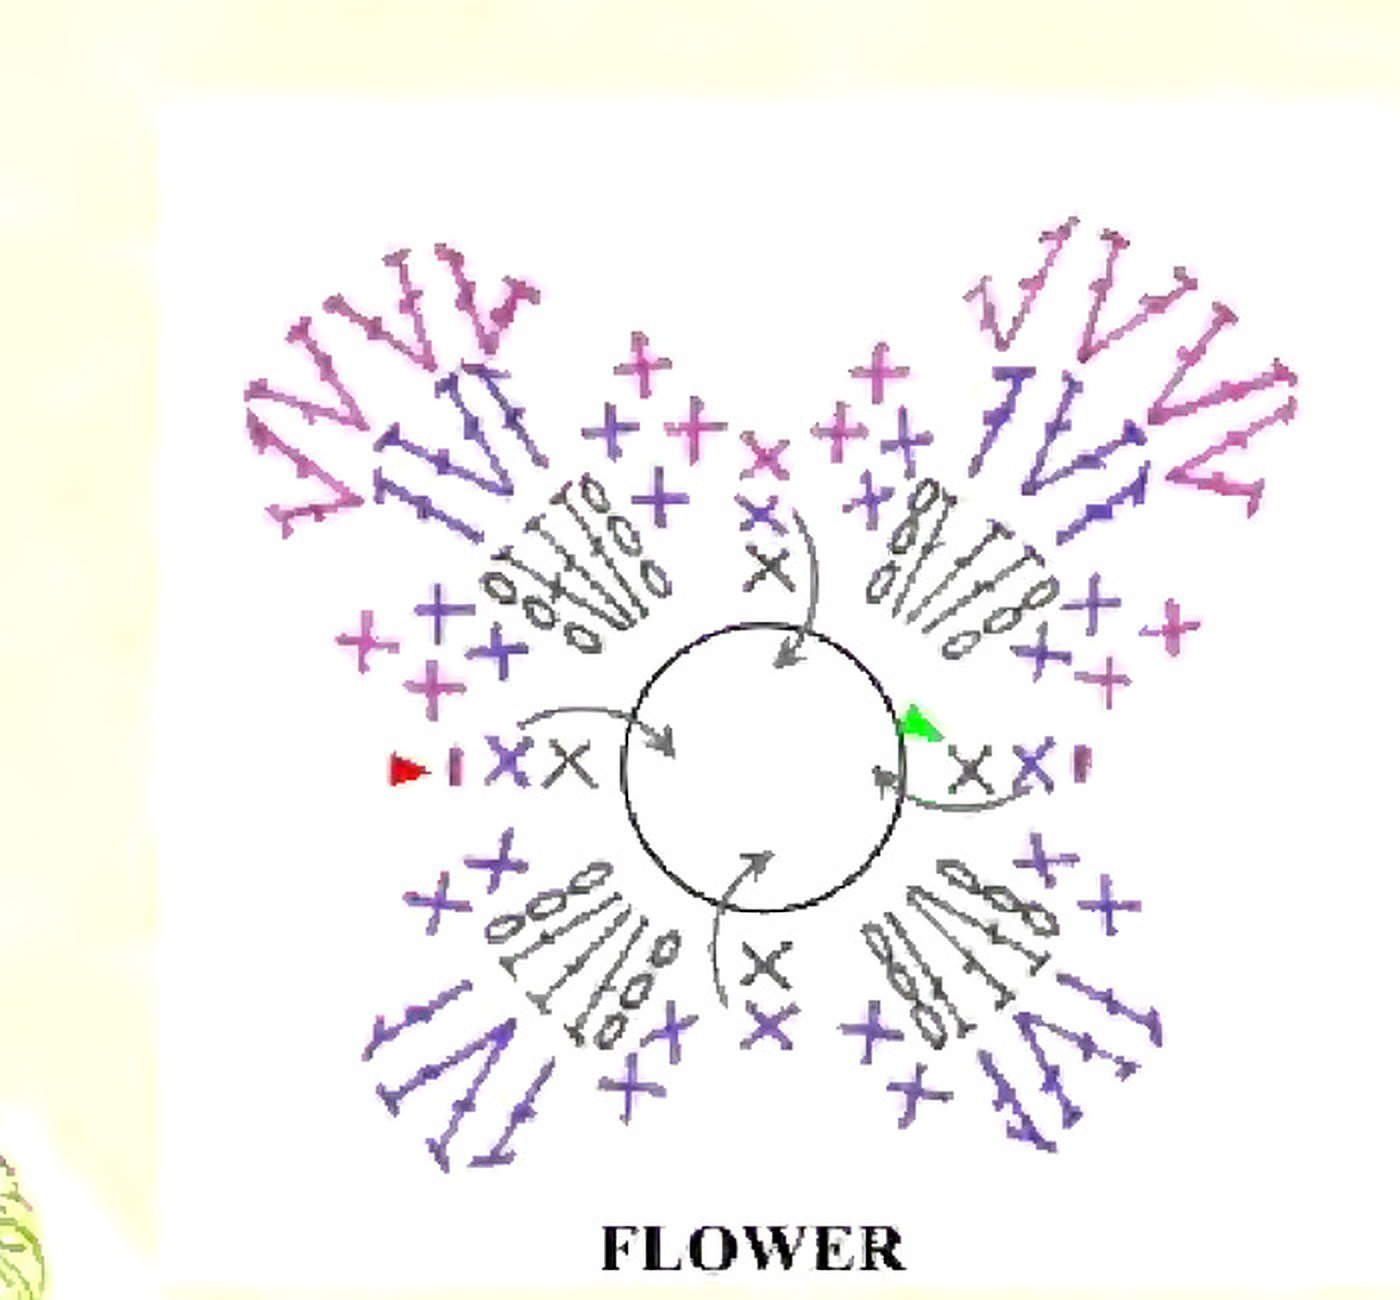
Read the chart from the magic ring outward. The colored symbols correspond to the yarn used in each round: yellow first, violet second, and lilac last.
The chart is especially useful for checking where each single crochet anchors into the center and where the outer increases form the rounded lobes.
Add the wire stem
- Weave in every yarn tail without pulling the petals out of shape.
- Cut a suitable length of 0.6 mm wire and smooth both ends.
- Insert the wire from the back of the flower through the center area shown in Figure 1.
- Bring the wire back through so two equal ends extend behind the flower.
- Twist the wire ends together directly beneath the flower as shown in Figure 2.
- Shape the flower gently from the front and check that the stem sits centrally.

1. Prepare the materials
Gather the three yarn colors, 1.9 mm hook, 0.6 mm wire, needle, scissors, and cutters.
Pansy crochet pattern: final checks
- The flower has four clear petal sections.
- The yellow center is tight and centered.
- Violet stitches frame the yellow evenly.
- Lilac increases create smooth rounded edges.
- No stitch has been mistaken for a decrease.
- All yarn tails are hidden securely.
- The wire passes through the back center.
- No sharp wire end remains exposed.
- The stem sits straight beneath the flower.
- The finished petals lie evenly.
Pansy crochet pattern questions
What does “2 dc together” mean in this pansy crochet pattern?
The source uses this phrase for two double crochets in the same stitch. Work an increase each time it appears. The stitch key above uses “dc inc” to make that meaning clear.
Which yarn and hook does the pansy crochet pattern use?
The listed materials are Cotton 8 in yellow, violet, and lilac, with a 1.90 mm hook. The original source gives no finished dimensions or gauge measurement, so this guide does not promise an exact flower size.
Where does the lilac edging go?
Follow the lilac symbols on the original stitch chart. Round 3 has two groups of four increases separated by five single crochets; use the chart to locate these groups rather than repeating the sequence around every petal.
Leave a Reply