
Stella Crochet · Amigurumi & Toys
Baby Panda Crochet Pattern
Make a plush panda with dark eye patches, joined ears, rounded cheeks, and a small tail. Use a 3.5 mm hook and velvet yarn to make a panda measuring about 20 cm in the sample.

Project Overview
The panda has two ears, a shaped oval-start head, two arms, two legs, a joined body, and a stuffed tail. The face is finished with needle sculpting and black embroidery. The instructions cover the stitch counts, shaping, and assembly order for each piece.
Before you start: Have a 3.5 mm hook, dark and white plush yarn, 16 mm eyes, a safety nose, black face yarn, and stuffing ready. See the complete materials and stitch guide.
Follow the Baby Panda Steps
Review the materials and abbreviations, then use Next and Previous to follow the pieces in order. The complete round-by-round pattern remains below.
STEP 1 OF 8
Ears and oval head
Make two dark ears: R1 6 sc in MR; R2 6 inc (12); R3 12 sc. Fold each ear and join through both sides with 6 sc.
For the white head, chain 5. In R1 work inc, 2 sc, 3 sc in the last chain, then 3 sc on the other side (10). R2 reaches 16; R3 has 16 sc; R4 has 16 sl st. Use the numbered oval chart for R1.

STEP 2 OF 8
Work the dark eye patches
In R5 work in back loops, changing from white to dark for 3 inc on each eye patch, then back to white as written; the round finishes at 26 stitches. In R6 increase through the corresponding white and dark sections to 36 stitches.
Fasten off the dark yarn. R7: 4 sc, inc, 22 sc, inc, 8 sc (38). Work R8–11 even at 38 sc.

STEP 3 OF 8
Join ears and place features
In head R12 join both ears through their six stitches, with the two decreases and intervening stitches exactly as written below (36). Check that the ears align with the eyes and nose; if joining evenly is difficult, the instructions allow sewing them on after the head is complete.
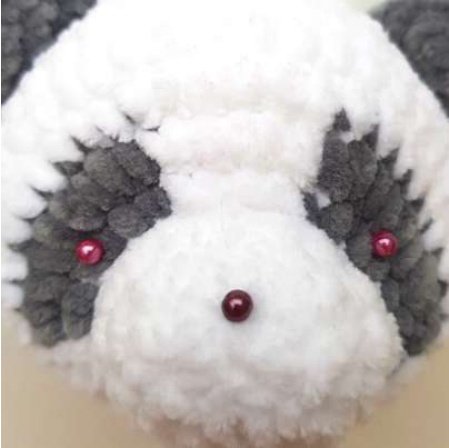
Place 16 mm eyes in head R5, 10 sc apart counting from the eye legs. Place the nose in snout R2 near the R1–R2 border. Check alignment before fixing the washers.
STEP 4 OF 8
Decrease and stuff the head
Head R13: (4 sc, dec) × 6 (30). R14: (3 sc, dec) × 6 (24). R15: (2 sc, dec) × 6 (18). Stuff the snout and cheeks so they can be shaped in the later needle-sculpting step.
R16: (1 sc, dec) × 6 (12), then finish stuffing. R17: 6 dec (6). Fasten off, close the opening with a needle, and keep the face ready for sculpting.

STEP 5 OF 8
Crochet the arms and legs
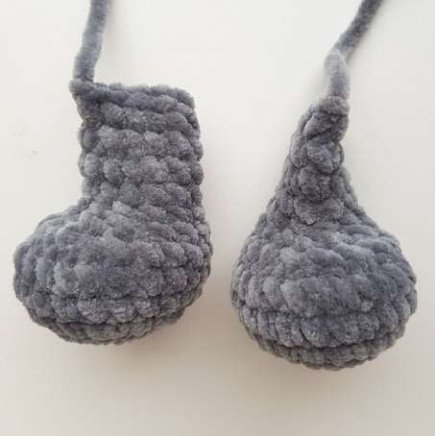
Make two dark arms. R1 starts with 6 sc, R2–5 have 12 sc, R6 decreases to 8, and R7–9 stay at 8. Stuff only the lower parts; fold and join each arm through both sides with 4 sc.
Make two dark legs. R1 starts at 6, R2 reaches 12, R3 reaches 18, R4–6 have 24, R7 has 18, R8–11 have 12, and R12 has 10. Stuff only the lower parts; make 1–2 extra sc, then fold and join each leg with 5 sc.
STEP 6 OF 8
Join the body and make the tail
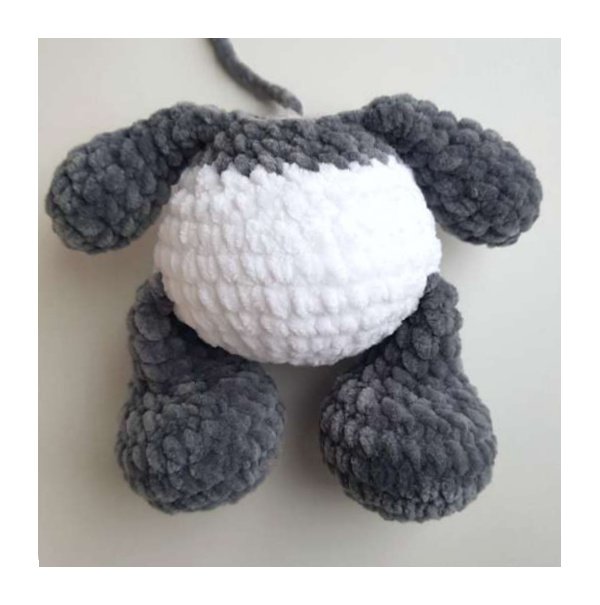
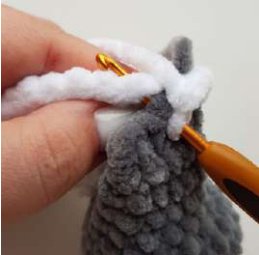
Start the body in white: R1 6 sc, R2 12, R3 18, R4 24, R5 30, R6 36. Join both legs in R7 (36). Work R8 at 36, R9 at 30, R10 at 30, and six decreases across the tummy in R11 (24). Change to dark for R12 (24); R13 decreases to 18 and R14 joins both arms (18).
Make the dark tail separately: R1 6 sc, R2 12, R3 12, R4 6. Stuff it and leave the yarn end for sewing.
STEP 7 OF 8
Sculpt and embroider the face
Use a long needle and strong thread for the face. Follow the labeled needle route A → B → C → D, then A → E → F → A. Tighten and shape the cheeks and muzzle with your fingers, tie the thread, and hide the ends.
With black 4-ply yarn, embroider the eyelids and mouth after sculpting. Use the diagrams and the full written route below.

STEP 8 OF 8
Sew the head and tail
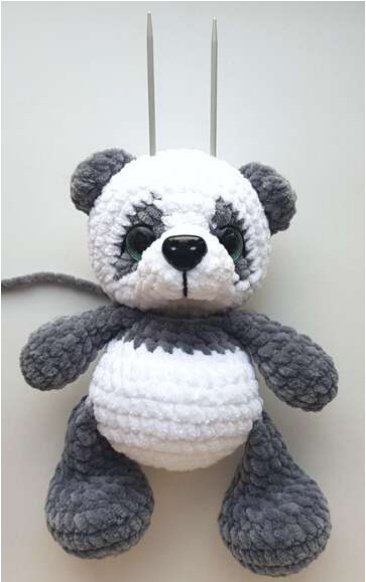
Position the head evenly with two long needles. Sew it to the body with the neck line close to the sculpted muzzle, then reinforce the neck with fiberfill.
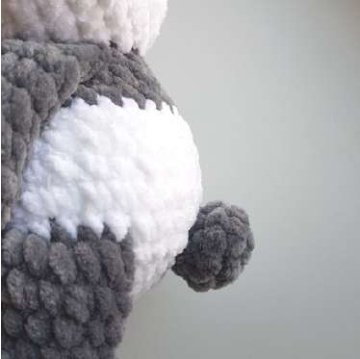
Sew the stuffed tail at body Rounds 5–6 using the remaining yarn end. Compare the final placement with the photos below.
Materials, Size, and Stitch Guide
Check the listed materials, size notes, and US stitch abbreviations before starting.
Required materials
LIST OF REQUIRED MATERIALS
1. Super Bulky/Super Chunky velvet yarn Himalaya Dolphin baby
   100g/120m or analogue.
    Dark color 35-40 g each
    White color 25-30 g each


2. Fine/4ply yarn Yarnart Jeans 50g/160m
   for face decoration (black);
3. Hook size 3,5 mm;
4. Safety eyes size 16 mm;
5. Safety nose size 18*15 or 16*14 mm;
6. Needle 8-10 cm long and any strong needle for needle sculpting;
7. Sewing pins for fastening small pieces before sewing on;
8. Fiberfill;
9. Needle with a wide eye for sewing pieces;
10. Stitch marker (pin) for marking a round beginning;
11. Scissors;
12. Two knitting needles or long needles for fastening the head;
13. Lighter for singeing plush ends.
Abbreviations and color change
For US stitch terminology, consult the Craft Yarn Council abbreviation guide.
ABBREVIATIONS
MR - magic ring
CH – chain
SL ST – slip stitch
SC – single crochet
INC – increase (make 2 sc in one stitch)
DEC – decrease (2 sc together)
(....)*6 – repeat instruction in brackets 6 times
...... (N) - number in brackets indicates the total number of stitches in
the row/round


How to change color in crocheting:

Important information
IMPORTANT INFORMATION!

                      What is the size of the toy?
It TOTALLY depends on YOUR gauge and yarn weight, as well as the size
of the hook and even the crocheting technique (cross, checkmark or
mixed). The 20 cm sample was crocheted in the "checkmark" method.
                   How much yarn will be needed?
60-70 g of Himalaya Dolphin baby yarn was used for the entire toy.
Consumption may vary with another yarn brand.

                               About gauge
Use a hook no larger than 3.5 mm or crochet tightly enough to avoid holes.
                      About stuffing with fiberfill
Stuff the toy firmly to shape the cheeks, tummy, and other rounded areas.
Do not overstuff. Stuff only the lower parts of the arms and legs.


               About singeing the ends of the thread
Lightly singe plush yarn ends with a lighter to prevent fluff from shedding.
Ears and Head
This baby panda crochet pattern starts the head with an oval base. Use the five-chain oval chart alongside Head Round 1 below.
Start the complete round-by-round instructions here. The head’s oval chart and color photographs remain alongside the written directions.
EARS (make 2)
Crochet with dark yarn color.
R1. 6sc in MR or ch2, 6sc in the 2nd ch from the hook (6)
R2. 6inc (12)
R3. 12sc (12)
Fold the ear in half and crochet 6sc through
both sides. Fasten off and cut the yarn.


HEAD
Start crocheting with white color.                    - single crochet
R1. 5 ch, start in the second chain from the hook:
     inc, 2sc, 3sc in the last chain,
    3sc on the other side of the chain (10)
          See the chart of this round

R2. 2inc, 2sc, 3inc, 2sc, inc (16)
R3. 16sc (16)
R4. 16sl st (16)

Head: Eye Patches and Shaping
R5. Work in back loops, and also in this round crochet the dark eye spots.
White color: 1sc, inc, dark color: 3inc, white color: 2inc, dark color: 3inc,
white color: inc, 5sc (26)


R6. White color: 2sc, inc, dark color: (1sc, inc)*3, white color: (1sc,
inc)*2, dark color: (1sc, inc)*3, white color: 1sc, inc, 5sc (36)


Cut the dark yarn, fasten off. Next, crochet in white color.
R7. 4sc, inc, 22sc, inc, 8sc (38)


R8-11. 38sc (38) 4 rounds
Head: Ear Join and Safety Features
R12. Join the ears in this round: 8sc, 6sc with the ear, 3sc, dec, 2sc, 6sc
with the ear, 9sc, dec (36)


Check this round, the ears should be evenly spaced in relation to the eyes
and nose. If necessary, adjust the round, crochet again according to your
pattern.
If you cannot join the ears evenly, then do not do it at all, sew them
separately when you complete the head.


Insert safety eyes 16mm in round 5 at a distance of 10 sc, counting from the
eye legs. The photo shows the points where we insert the leg of the eye.

Before securing the eyes with washers,
check that they are even.

Insert the nose in round 2 of the snout. Not
in the very center, where the foundation
chain is, but a little higher, on the border of
rounds 1 and 2.

Head: Decreases and Stuffing
R13. (4sc, dec)*6 (30)
R14. (3sc, dec)*6 (24)
R15. (2sc, dec)*6 (18)
Stuff the head with fiberfill. With a little effort, push fiberfill with your fingers
into the snout so that it is convex. Pay attention to the cheeks, pull the
crocheted fabric to the sides and stuff these places well to make the cheeks
rounded.
NOTE! Stuff the head so that later you can easily make a good face
needle sculpting.
R16. (1sc, dec)*6 (12) stuff the head completely
R17. 6dec (6)
Fasten off with sl st, cut the yarn, close up the hole with a needle.
Arms and Legs
ARMS (make 2)
Crochet with dark yarn color.
R1. 6sc in MR or ch2, 6sc in the 2nd ch from the hook (6)
R2. 6inc (12)
R3-5. 12sc (12) 3 rounds
R6. (1sc, dec)*4 (8)
Stuff only the lower part of the arms.
R7-9. 8sc (8) 3 rounds
Fold the detail in half and crochet 4sc through
both sides. Fasten off and cut the yarn.


LEGS (make 2)
Crochet with dark yarn color.
R1. 6sc in MR or ch2, 6sc in the 2nd ch from the hook (6)
R2. 6inc (12)
R3. (1sc, inc)*6 (18)
R4. (inc, 2sc)*6 (24)
R5-6. 24sc (24)
R7. 6sc, 6dec, 6sc (18)
R8. 3sc, 6dec, 3sc (12)
R9-11. 12sc (12) 3 rounds
R12. (4sc, dec)*2 (10)
Stuff only the lower part of the leg.
Make 1-2 extra sc. Fold the leg in half
and crochet 5sc through both sides.
Fasten off and cut the yarn.

Body and Leg Join
BODY
Start crocheting with white color.
R1. 6sc in MR or ch2, 6sc in the 2nd ch from the hook (6)
R2. 6inc (12)
R3. (1sc, inc)*6 (18)
R4. (inc, 2sc)*6 (24)
R5. (3sc, inc)*6 (30)
R6. 1sc, inc, (4sc, inc)*5, 3sc (36)
R7. Join the legs in this round (the marker passes at the back): 6sc, 5sc
with the leg, 14sc, 5sc with the leg, 6sc (36)


R8. 36sc (36)
R9. (4sc, dec)*6 (30)
R10. 30sc (30)
R11. 10sc, 6dec, 8sc (24)
Check this round, 6 decreases should be even in relation to the legs,
because we should get a bulging tummy. Adjust this round if it shifted.
Differences are possible because everyone has a different gauge and incline
of crocheting and yarn weight.

Cut the white yarn, fasten off, continue crocheting in dark color.
R12. 24sc (24)
R13. (2sc, dec)*6 (18)
Arm Join and Tail
R14. Join the arms in this round: 4sc, 4sc with the arm, 5sc, 4sc with the
arm, 1sc (18)
Check this round: the arms should be located exactly in relation to the legs.
If necessary, adjust the round, crochet again according to your pattern.

Crochet 1 sl st, cut the yarn, leaving a long end for sewing pieces. Stuff the
body with fiberfill.


 TAIL
 Crochet with dark yarn color.
 R1. 6sc in MR or ch2, 6sc in the 2nd ch from the hook (6)
 R2. 6inc (12)
 R3. 12sc (12)
 R4. 6dec (6)
 Crochet 1 sl st, cut the yarn, leaving a long tail for
 sewing pieces. Stuff the tail.
Needle Sculpting
ASSEMBLY
Start from the face needle sculpting. Take a needle that is suitable in length
and a nylon thread (or any other strong thread). The stronger you make the
tightening, the more the cheeks of the toy will stand out.


Insert the needle in round 4 at point A and exit it through point B, next to the
eye, then insert it at point C, also next to the eye, and exit it through point D
(at a distance of 1 sc from point B). Next, insert the needle at point A and
exit at point E, next to the other eye, then insert the needle at point F, next
to the eye, and return to point A.
Take both ends of the thread, tighten each end, and at the same time press
your fingers on the eyes, muzzle, so that the tightening is properly formed.
When you like the look of the face, tie a couple of knots and hide them in the
head of the toy..

Face Decoration
BEFORE needle sculpting          AFTER needle sculpting


Face Decoration

Using black 4ply yarn YarnArt Jeans and a suitable needle, embroider the
eyelids and mouth.

Sewing the Head and Tail
Sew the head to the body.
Outline the even location of the head with two knitting needles. Fix the
head so that the neck line is very close to the place where the muzzle was
tightened (see photo).
Sew with the remaining yarn tail from the body or with any other strong
thread. Strengthen the neck area by stuffing with fiberfill.


Sew on the tail
Sew the tail at the level of rounds 5-6, using a needle and the yarn end that
remained after crocheting the tail.
Round Count Checkpoints
| Piece | Stitch counts |
|---|---|
| Head | R1 10 · R2 16 · R5 26 · R6 36 · R7–11 38 · R12 36 · R13 30 · R14 24 · R15 18 · R16 12 · R17 6 |
| Arms (two) | R2 12 · R6 8 · fold and join 4 sc |
| Legs (two) | R4–6 24 · R7 18 · R8–11 12 · R12 10 · fold and join 5 sc |
| Body | R6–8 36 · R9–10 30 · R11–12 24 · R13–14 18 |
| Tail | R1 6 · R2–3 12 · R4 6 |
The instructions permit shifting the ear, arm, and tummy placement to align with the face and legs. Read those specific notes in the complete instructions before changing placement.
Baby Panda Crochet Pattern Questions
How large is the finished panda?
The sample is 20 cm high; size varies with gauge, yarn, hook, and crochet method.
Where are the safety eyes and nose placed?
Place 16 mm eyes in head Round 5 at a distance of 10 sc counting from the eye legs, and the nose in Round 2 of the snout near the border with Round 1. Check evenness before fixing the washers.
Can the ears be sewn on instead?
Yes. Sew them separately after completing the head if joining them evenly in Round 12 is difficult.
Leave a Reply