
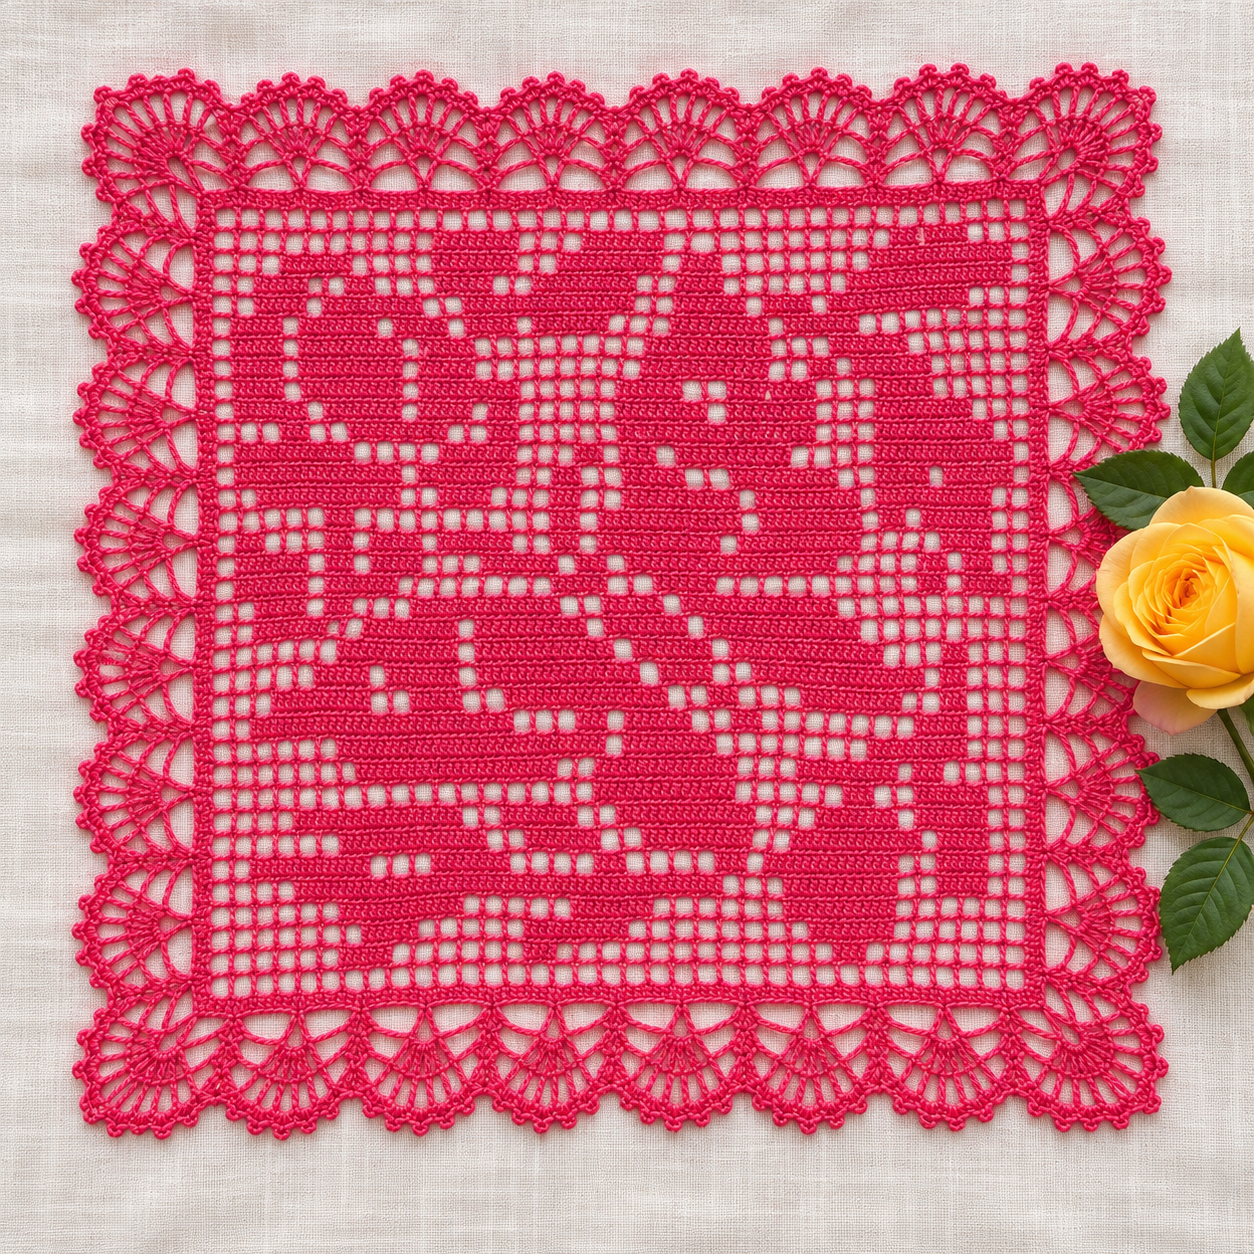
A Pink Rose Doily with a Lace-Fan Edge
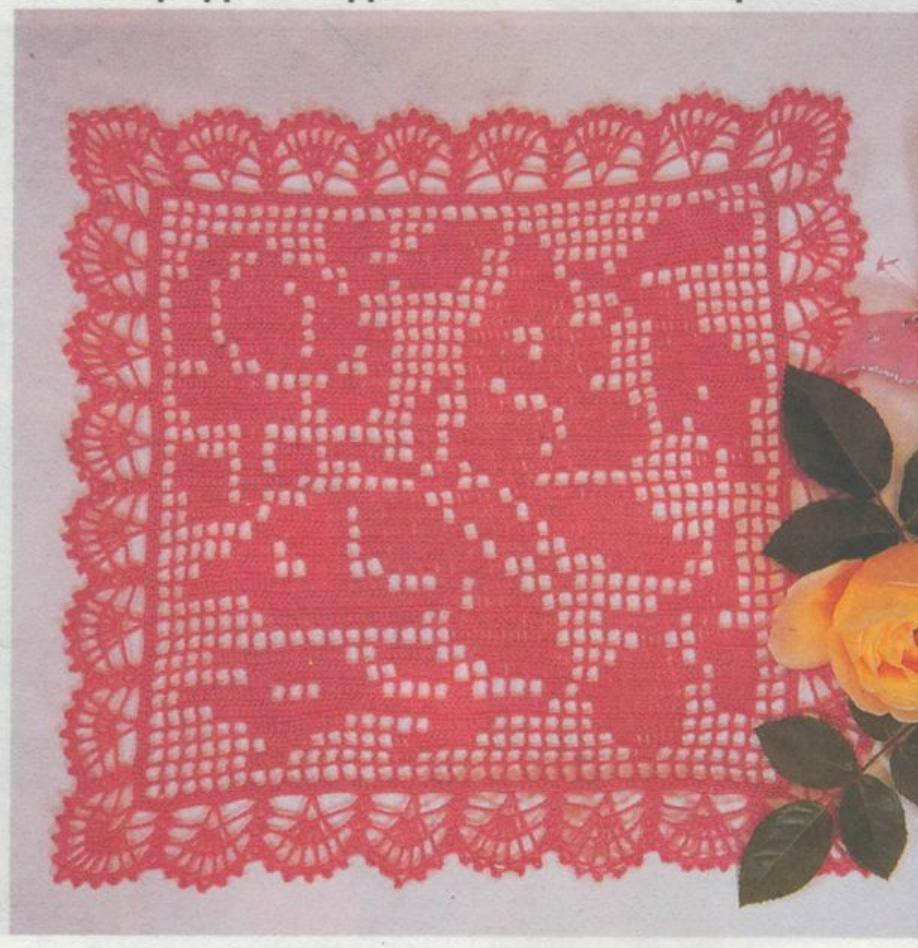
This vivid 1994 square combines a 35-row rose filet motif with six rounds of fans and picots. Follow every row and the original border diagram directly on the page.
Why You’ll Love This Pattern
The saturated pink thread lets the rose motif and open squares stand out, while the wide scalloped border gives a modest 35-cell panel a generous finish. It is an engaging way to practice precise filet counting and read a historical lace edge.
About the images: The featured picture is an illustrative visualization close to the original photograph, not a newly crocheted or stitch-accurate sample. The actual magazine image and source charts are below. The yellow flower in that photo is a prop, not part of the doily.
Pattern at a Glance
Materials and Tools
The source uses 40 g pink 100% cotton, 388 m per 50 g and a No. 1–1.25 hook in its historical notation. Swatch if matching the approximate 28 × 28 cm size is important.
Modern optional supply choices to compare with the stated source specifications:
- Lizbeth cotton thread or YarnArt Canarias thread to explore pink shades and gauge.
- Clover fine hook set to select the hook for your swatch.
- Clover row counter for 35 body rows.
- Blocking mats and T-pins for the square and fan edge.
Some supply links are affiliate links. Stella Crochet may earn a commission from qualifying purchases at no extra cost to you.
Notes Before You Begin
Foundation: Chain 106 + 3 turning chains = 109 chains. This makes 35 filet cells; the base agrees with 3 × 35 + 1 = 106. Begin Row 1 at the bottom right of the chart and alternate working direction each row.
Filet II using the source patent post: O (open) is one patent post and two chains. F (filled) is three patent posts in the space occupied by an open cell. Adjacent cells share a boundary post; do not add a new post at every cell edge.
Patent post in US terms: Yarn over, insert hook and draw up a loop; yarn over and draw through that newly drawn loop only, creating its small base. Then yarn over and draw through two loops twice. Use this extended double-crochet style post wherever the source calls for a patent post, including body cells.
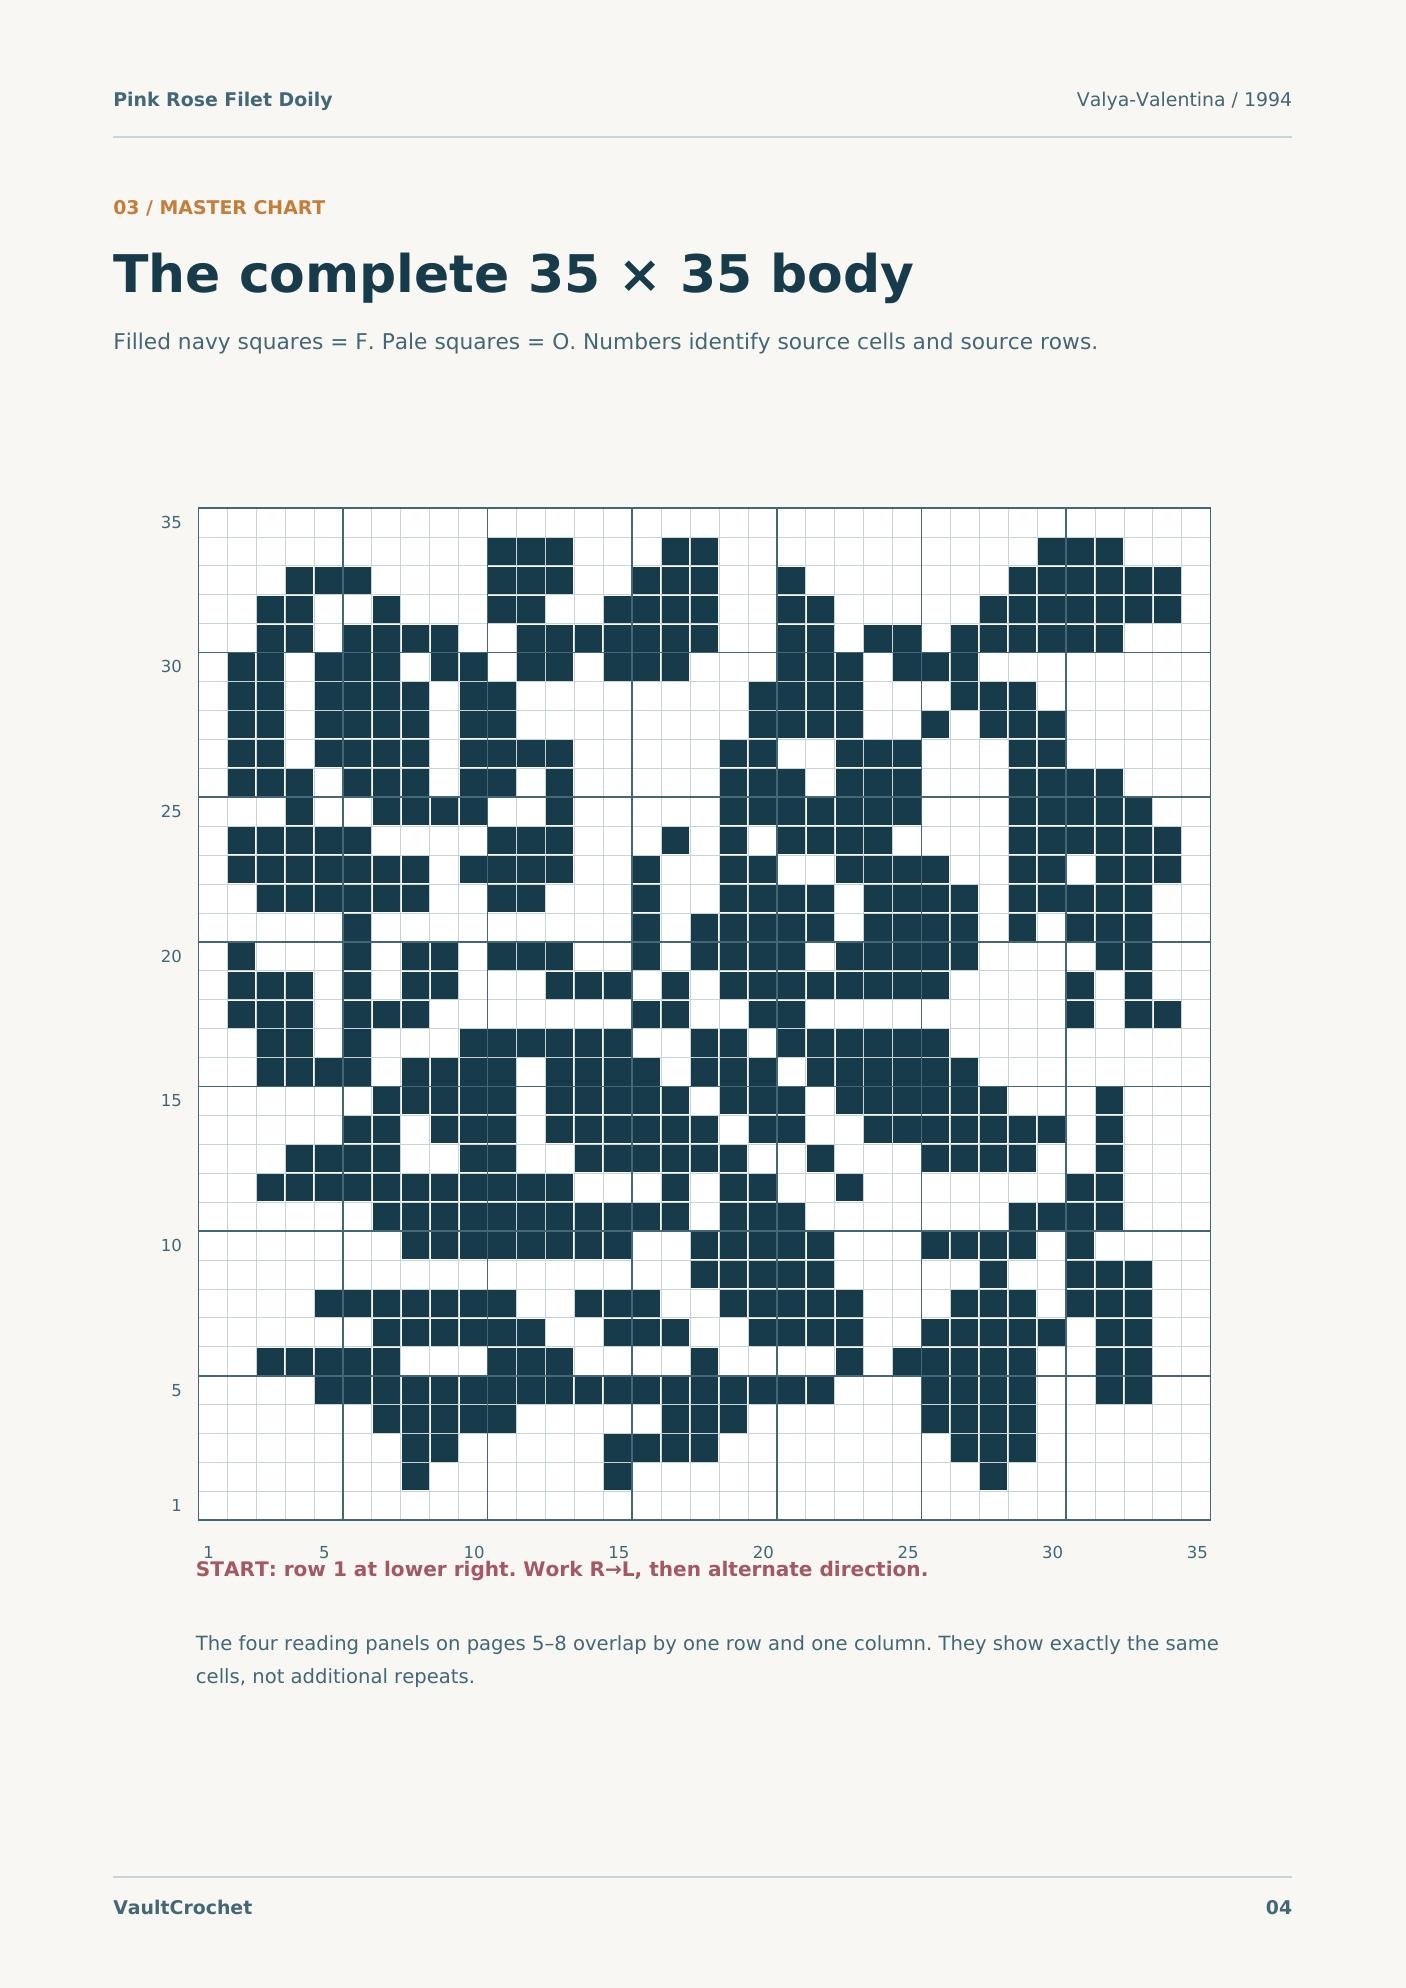
Read the 35 × 35 Rose Chart
Row 1 sits at the bottom and is all open cells. Filled squares are F and pale squares O. Work upward and compare the written runs below with the actual source map.
Follow Along Row by Row
Use Previous and Next, jump to any row, or enlarge the text. Your place and completed rows are stored in this browser; the complete pattern remains visible below.
Complete Free Pink Rose Filet Crochet Doily Pattern
These 35 cell runs are in working direction. O is open, F filled; each row spans exactly 35 cells. Work the source patent post in both cell types, as described above.
Rows 1–10
- Row 01 · R→L: O35
- Row 02 · L→R: O7 F1 O6 F1 O12 F1 O7
- Row 03 · R→L: O6 F3 O8 F4 O5 F2 O7
- Row 04 · L→R: O6 F5 O5 F3 O6 F4 O6
- Row 05 · R→L: O2 F2 O2 F4 O3 F18 O4
- Row 06 · L→R: O2 F5 O3 F3 O4 F1 O4 F1 O1 F5 O2 F2 O2
- Row 07 · R→L: O2 F2 O1 F5 O2 F4 O2 F3 O2 F6 O6
- Row 08 · L→R: O4 F7 O2 F3 O2 F5 O3 F3 O1 F3 O2
- Row 09 · R→L: O2 F3 O2 F1 O5 F5 O17
- Row 10 · L→R: O7 F8 O2 F5 O3 F4 O1 F1 O4
Rows 11–20
- Row 11 · R→L: O3 F4 O7 F3 O1 F11 O6
- Row 12 · L→R: O2 F11 O3 F1 O1 F2 O2 F1 O7 F2 O3
- Row 13 · R→L: O3 F1 O2 F4 O3 F1 O2 F6 O2 F2 O2 F4 O3
- Row 14 · L→R: O5 F2 O1 F3 O1 F6 O1 F2 O2 F7 O1 F1 O3
- Row 15 · R→L: O3 F1 O3 F6 O1 F3 O1 F5 O1 F5 O6
- Row 16 · L→R: O2 F4 O1 F4 O1 F4 O1 F3 O1 F6 O8
- Row 17 · R→L: O9 F6 O1 F2 O2 F6 O3 F1 O1 F2 O2
- Row 18 · L→R: O1 F3 O1 F3 O7 F2 O2 F2 O9 F1 O1 F2 O1
- Row 19 · R→L: O2 F1 O1 F1 O4 F8 O1 F1 O1 F3 O3 F2 O1 F1 O1 F3 O1
- Row 20 · L→R: O1 F1 O3 F1 O1 F2 O1 F3 O2 F1 O1 F4 O1 F5 O4 F2 O2
Rows 21–30
- Row 21 · R→L: O2 F3 O1 F1 O1 F4 O1 F5 O1 F1 O9 F1 O5
- Row 22 · L→R: O2 F6 O2 F2 O3 F1 O2 F4 O1 F4 O1 F5 O2
- Row 23 · R→L: O1 F3 O1 F2 O2 F4 O2 F2 O2 F1 O2 F4 O1 F7 O1
- Row 24 · L→R: O1 F5 O4 F3 O3 F1 O1 F1 O1 F4 O4 F6 O1
- Row 25 · R→L: O2 F5 O3 F7 O5 F1 O2 F4 O2 F1 O3
- Row 26 · L→R: O1 F3 O1 F3 O1 F2 O1 F1 O5 F3 O1 F3 O3 F4 O3
- Row 27 · R→L: O5 F2 O3 F3 O2 F2 O5 F4 O1 F4 O1 F2 O1
- Row 28 · L→R: O1 F2 O1 F4 O1 F2 O8 F4 O2 F1 O1 F3 O5
- Row 29 · R→L: O6 F3 O3 F4 O8 F2 O1 F4 O1 F2 O1
- Row 30 · L→R: O1 F2 O1 F3 O1 F2 O1 F2 O1 F3 O3 F3 O1 F3 O8
Rows 31–35
- Row 31 · R→L: O3 F6 O1 F2 O1 F2 O2 F7 O2 F4 O1 F2 O2
- Row 32 · L→R: O2 F2 O2 F1 O3 F2 O2 F4 O2 F2 O5 F7 O1
- Row 33 · R→L: O1 F6 O7 F1 O2 F3 O2 F3 O4 F3 O3
- Row 34 · L→R: O10 F3 O3 F2 O11 F3 O3
- Row 35 · R→L: O35
Six-Round Historical Edging
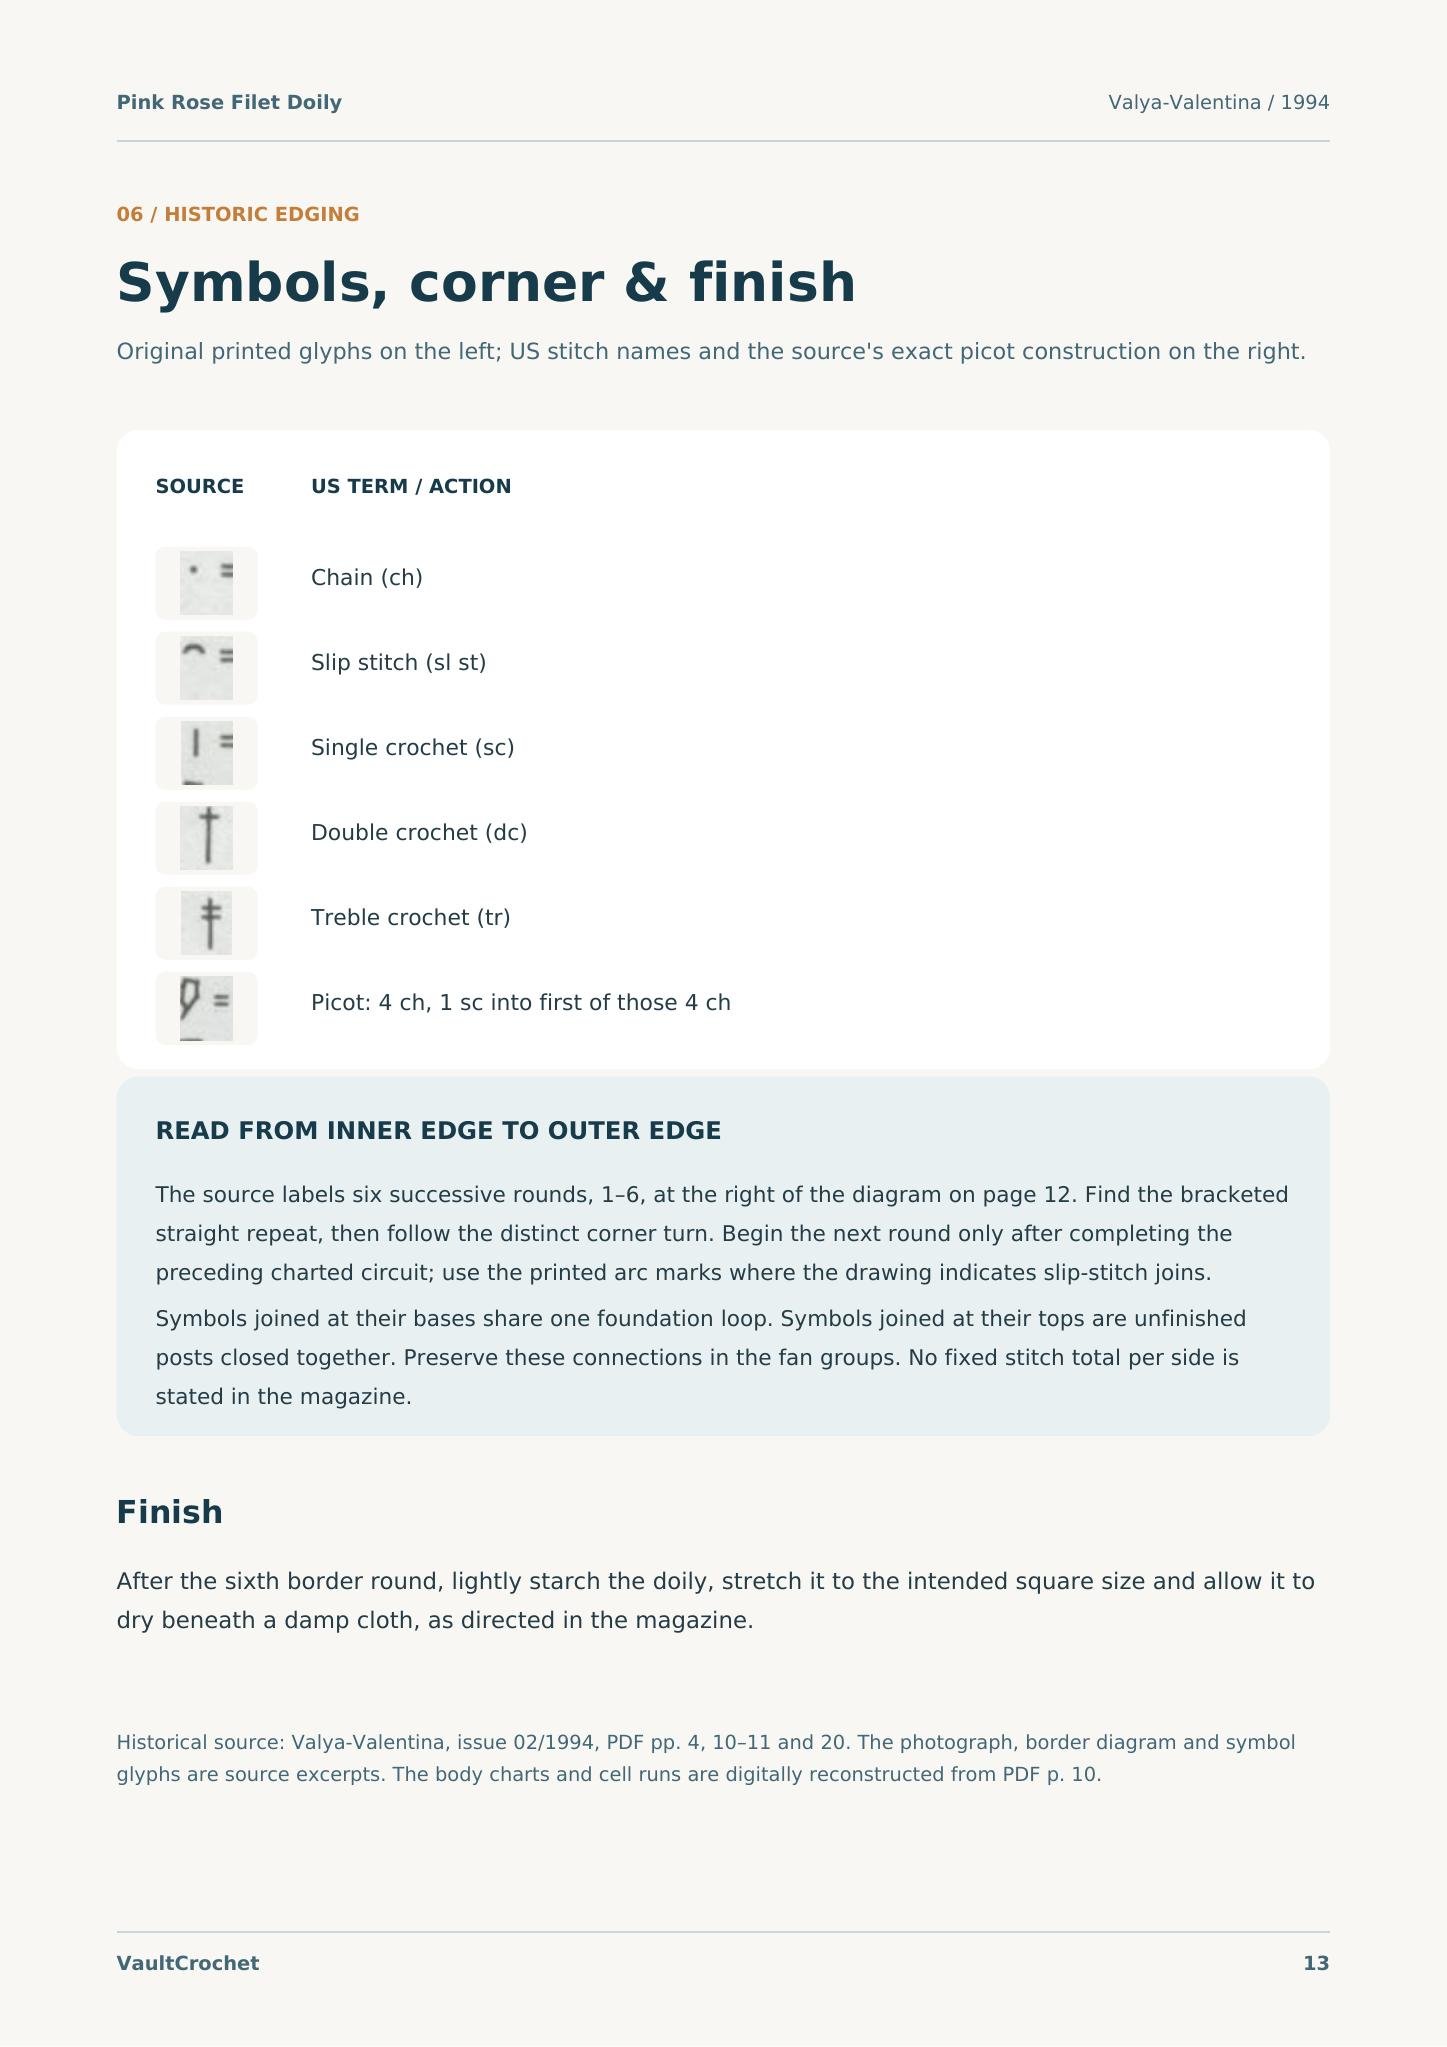
The source shows a straight repeat and a distinct corner for six successive rounds. Follow the glyphs from inner edge to outer edge, completing each circuit before the next. Symbols joined at their bases share one foundation loop; symbols joined at their tops are unfinished posts closed together. Preserve those connections in the fan groups. The source gives no fixed stitch count per side.
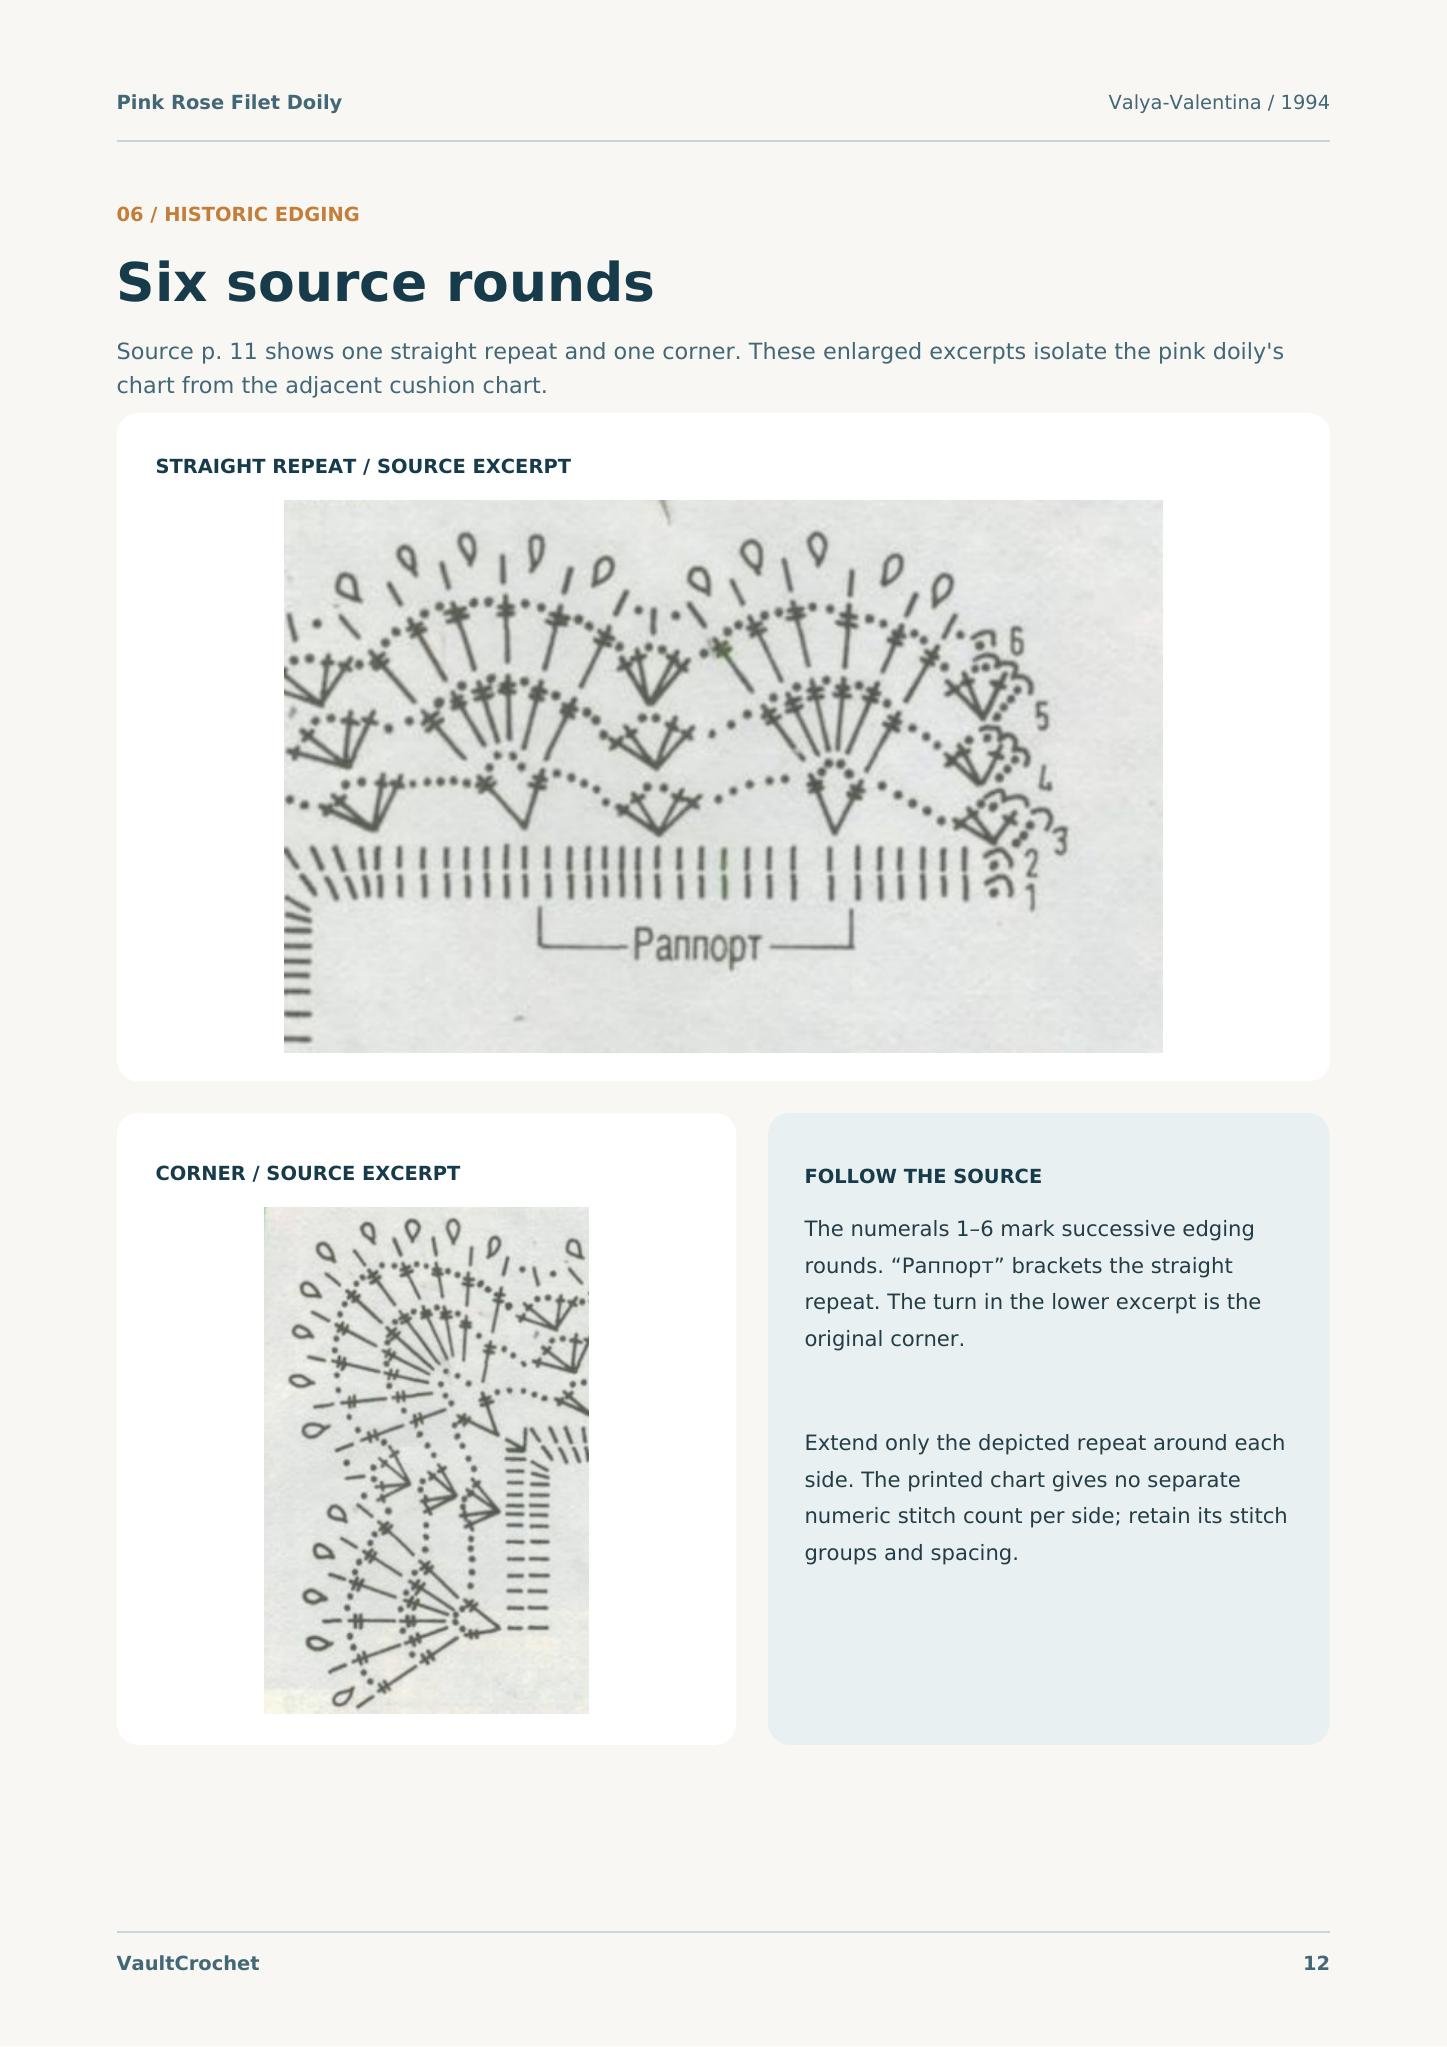
Round guide: Round 1 is the first inner sc course; Round 2 is the second sc course. Round 3 begins the shared-base post groups, Round 4 follows the next fan groups and chain arcs, Round 5 works outer post groups over previous arches, and Round 6 finishes outer arches and picots. At each corner follow the distinct source turn in the same numbered round. Rejoin where the chart prints its slip-stitch mark.
Source picot: 4 chains, 1 single crochet into the first of those four chains. After Round 6, lightly starch, stretch to the intended square size, and allow to dry beneath a damp cloth.
The Original Pink Doily
The original 1994 magazine photograph shows the finished pink lace square. The yellow rose next to it is a separate prop.
Pink Rose Filet Crochet FAQs
Is the entire pattern free?
Yes. All 35 written rows, the body chart, six-round edging charts and finishing method appear here.
What is the patent post?
It is the source’s extended double-crochet style post. Its exact sequence is in Notes Before You Begin; use it in the Filet II body cells.
Does the yellow flower belong to the doily?
No. The flower is a prop in the historical photograph; the crochet motif is worked into the pink filet square.
How big will it be?
The source estimates approximately 28 × 28 cm including edging at its stated gauge.
More Free Filet Crochet
Continue with the square filet doily, the floral oval runner, or the peacock filet insert. Browse the Filet Crochet collection.
Try the pink rose doily and share your result. Did the patent post and fan border work smoothly? Tell us what felt clear, what puzzled you, and whether you made any adjustments.
Leave a Reply