
Stella Crochet · Flowers & Plants
A Wired Tulip With Four Sculpted Petals
This tulip flower crochet pattern creates a softly closed bloom with four wired petals, three pearl pistils, and a wrapped green stem. The long foundation-chain petals fold naturally around the center, while the orange edging adds definition to the pale-yellow flower.
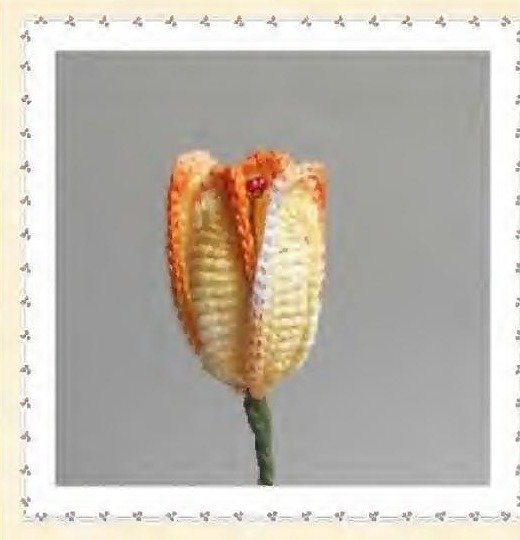
Pattern overview
The tulip flower crochet pattern is assembled from four identical oval petals and three pearl pistils. Each petal begins along a 15-chain foundation, is worked on both sides of that chain, and receives a second round that encloses 0.6 mm craft wire. The completed petals surround the three-pistil center before every wire is twisted into one stem.
Materials and preparation
Materials
- Size 8 cotton thread in soft yellow and soft orange
- 1.90 mm crochet hook
- 0.6 mm flexible craft wire for four petals
- 0.3 mm craft wire for three pistils
- Three small red pearls or beads
- Green floral tape
- Scissors, wire cutters, and small pliers
Before you begin
For this tulip flower crochet pattern, use US crochet terminology. Cut four equal pieces of 0.6 mm wire before starting Round 2. Prepare three longer pieces of 0.3 mm wire for the pearl pistils. Work firmly so the petal fabric covers the wire cleanly without gaps.

Interactive step reader
Prepare two thread colors
Use soft yellow for the main petal and soft orange for the wired edging. Cut four equal 0.6 mm petal wires.
Start the first petal
With soft yellow, chain 15. Work along one side with single crochet, double crochet, ten triple crochets, and one double crochet.
Round the chain end
Work nine double crochets into the end chain. This large increase turns the work smoothly around the tip.
Complete the mirrored side
Work back along the opposite side with one double crochet, ten triple crochets, one double crochet, and one single crochet. Fasten off yellow.
Add the wired edge
Join soft orange and crochet around the petal while enclosing one 0.6 mm wire, following the exact Round 2 sequence below.
Finish four matching petals
Fasten off and repeat the complete petal until four equal wired pieces are ready.
Make three pistils
Thread each red pearl onto 0.3 mm wire, twist securely, then twist all three pistil wires together.
Assemble the tulip
Arrange four petals around the three pistils, twist all wires into one stem, shape the closed bloom, and wrap with floral tape.
US crochet abbreviations
ch chain
sc single crochet
dc double crochet
tr triple crochet
sl st slip stitch
inc multiple stitches in one stitch
st stitch
rep repeat
Complete tulip flower crochet pattern
For a balanced tulip flower crochet pattern, make four identical petals. The stitches of Round 1 are placed around both sides of the 15-chain foundation. The large increase at the far end creates the rounded petal tip.
Round 1 – soft-yellow petal
Chain 15. Beginning in the working chain indicated by the chart, work 1 sc, 1 dc, 10 tr, and 1 dc along the first side. Work 9 dc into the end chain. Continue along the opposite side with 1 dc, 10 tr, 1 dc, and 1 sc. Fasten off.
Round 2 – orange wired edge
Place one prepared 0.6 mm wire along the edge and crochet over it. Join soft orange and work 15 sc, 1 dc, 3 dc in the next stitch, 1 sc, 3 dc in the next stitch, 1 dc, 15 sc, and 1 sl st. Fasten off.
Make the three pearl pistils
- Cut three equal pieces of 0.3 mm wire.
- Insert one wire through a red pearl and bring the two ends together.
- Twist the wire immediately below the pearl until it is secure.
- Repeat for the remaining two pearls.
- Gather the three pearl stems and twist their wires together to create one compact center.
In this tulip flower crochet pattern, keep the three pearls at slightly different heights so they remain visible inside the closed tulip flower crochet pattern.

Assemble and shape the tulip
- Place the three twisted pearl pistils upright at the center.
- Position one petal on each side of the pistils, then add the remaining two petals across the open spaces.
- Bring all four petal bases to the same level.
- Twist each petal wire around the central pistil wires until the flower is secure.
- Shape the four petals into a gently closed cup, leaving the red pearls visible at the top.
- Wrap the complete stem tightly with green floral tape from the flower base downward.
To preserve the tulip flower crochet pattern shape, bend only the enclosed wire, not the crocheted fabric. Make small adjustments to preserve even stitches and a balanced tulip silhouette.
Finishing checks and questions
How many petals should I make?
Make exactly four petals. The assembly diagram places them evenly around the three-pistil center.
What does “9 dc together” mean?
For this tulip flower crochet pattern, it means nine double crochets worked into the same end chain. This increase turns the work around the rounded petal tip.
Can I replace the pearls?
Yes. Use three lightweight beads of a similar size. Their holes must accept the 0.3 mm wire, and every bead must be secured before assembly.
Can I omit the wire?
The petals can be crocheted without wire, but the finished bloom will be flatter and cannot hold the intended closed tulip shape. Work the orange edging as written if you omit it.
Final quality check
Confirm that all four petals match, the orange edging is continuous, each bead is secure, every cut wire end is covered, and the stem wrap has no exposed metal.
The images come from the original pattern source and were cropped, brightened, and sharpened only for clarity. The crochet design, colors, stitch chart, proportions, and assembly details were preserved.
Leave a Reply