

← Previous pattern: Crochet Hexi Hooded Pullover · Next pattern: Crochet Cable Hat and Scarf Set → · More wearables
These lace-up crochet baby shoes have an oval sole, a contrasting sidepiece and toe, a small tongue, and a folded upper. The instructions cover four foot lengths from about 8 to 12 cm. Measure the baby’s foot before choosing a size, and make the second shoe the same way.
At a glance
Construction: Sole in rounds, sidepiece in rounds, toe in decreasing rows, tongue and upper in rows, then laces. Terms: US crochet. Sizes: 0 months / 0–3 months / 3–6 months / 6–12 months. Follow the four numbers in that order throughout.
Materials and sizes · Sole · Sidepiece · Toe · Tongue · Upper and laces
Quick construction guide — tap to open
Make one oval sole in the main color, then work the contrast sidepiece around its outer posts. Decrease the toe in three rows, add the tongue across its top, work the upper around the remaining opening, fold three upper rows, and insert laces. The complete stitch-by-stitch instructions and placement photos follow.
Materials, gauge and finished foot lengths
- Two colors of Vita Cotton Lily, 100% mercerized cotton, each hank 1.75 oz / 50 g and 137 yd / 125 m. The instructions call them MC (main color) and CC (contrast color). A substitute yarn should match the proportions and gauge; Scheepjes Catona and Schachenmayr Catania are listed alternatives.
- US C/2 or D/3 hook (2.5 or 3 mm), or size needed to obtain gauge.
- Scissors, tapestry needle or smaller crochet hook, measuring tape, and shoelaces or satin ribbon (the sample uses 4 mm cord).
- Optional brooch, tag, or button for decoration.
Gauge: 26 dc by 13 rows = 4 in / 10 cm. Check gauge before starting.
| Size order | 0 months | 0–3 months | 3–6 months | 6–12 months |
|---|---|---|---|---|
| Approximate foot length | 3.15 in / 8 cm | 3.5 in / 9 cm | 3.9 in / 10 cm | 4.3–4.7 in / 11–12 cm |
| Sole starting chain | 16 | 19 | 22 | 26 |
| Sole Round 3 / sidepiece stitches | 56 | 62 | 68 | 76 |
US abbreviations
ch = chain; cont = continue; BOR = beginning of round; dc = double crochet; hdc = half double crochet; sc = single crochet; sl st = slip stitch; rnd = round; dc2tog = double crochet 2 together; dc6tog/dc7tog/dc8tog/dc9tog = work 6/7/8/9 double crochets together; RS = right side; WS = wrong side; st = stitch; MC = main color; CC = contrasting color. Where a starting chain is said to count as a stitch, include it in the round or row count.
Sole — make two
With MC, ch 16 / 19 / 22 / 26.
Round 1: Work 2 dc in the fourth chain from the hook; dc in each of the next 11 / 14 / 17 / 21 chains; 6 dc in the last chain. Continue along the opposite side of the foundation chain: dc in the next 11 / 14 / 17 / 21 stitches, then 3 dc in the last stitch. Join with a sl st to the starting chain. 34 / 40 / 46 / 54 stitches.
Round 2: Ch 1 (counts as 1 sc); sc in the same stitch and in the next stitch; 2 sc in the next stitch; sc in the next 4 / 5 / 6 / 7 stitches; hdc in next 2; dc in next 5 / 7 / 9 / 12; 2 dc in each of next 6; dc in next 5 / 7 / 9 / 12; hdc in next 2; sc in next 4 / 5 / 6 / 7; 2 sc in next; sc in next; 2 sc in next. Join with a sl st to the starting chain. 44 / 50 / 56 / 64 stitches.
Round 3: Ch 3 (counts as 1 dc), dc in the same stitch. [Dc in next stitch, 2 dc in next] twice; dc in next 11 / 14 / 17 / 21; [2 dc in next, dc in next] six times; dc in next 11 / 14 / 17 / 21; [2 dc in next, dc in next] twice; 2 dc in next stitch. Join with a sl st to the starting chain. 56 / 62 / 68 / 76 stitches. Fasten off and cut yarn.

Sidepiece
Round 1: With CC and the RS facing you, join at the beginning of round. Work into the posts of the dc from the last sole round rather than into their top loops; the RS will be inside the shoe. Ch 1 (counts as sc), then sc under each of the next 55 / 61 / 67 / 75 dc posts. Join with a sl st to the starting chain. 56 / 62 / 68 / 76 stitches.
Round 2: Ch 3 (counts as dc), dc in next 55 / 61 / 67 / 75 stitches. Join with a sl st to the starting chain. 56 / 62 / 68 / 76 stitches.
Round 3: Ch 1 (counts as sc), sc in next 55 / 61 / 67 / 75 stitches. Join with a sl st to the starting chain. 56 / 62 / 68 / 76 stitches. Fasten off and cut yarn. For a fuller foot or higher arch, repeat Round 3 one or two more times for a taller sidepiece.

Toe shaping
Work back and forth in rows with CC. Count 14 / 15 / 16 / 18 stitches from the BOR and join CC in the 15th / 16th / 17th / 19th stitch, as shown in the placement photos.
Row 1 (WS): Ch 2, dc in next stitch, dc2tog 13 / 15 / 17 / 19 times.
Row 2 (RS): Ch 2, dc in next stitch, dc2tog 6 / 7 / 8 / 9 times.
Row 3 (WS): Ch 2, then work dc6tog / dc7tog / dc8tog / dc9tog, according to size. Fasten off and cut yarn.
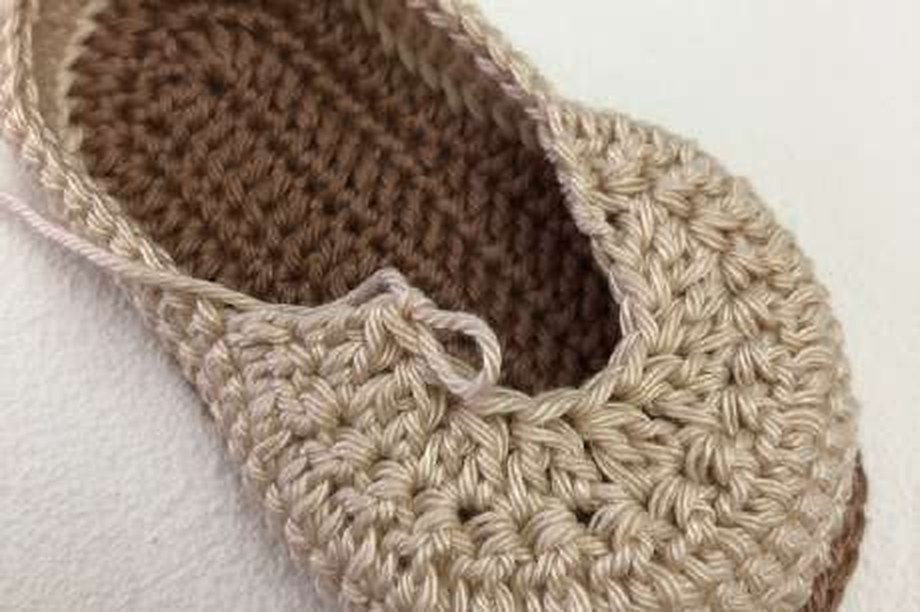
Tongue — same for all sizes
Continue with CC in turned rows. The first row uses the toe’s horizontal stitches and the side positions pictured below. Check the indicated start and end positions before working this row.
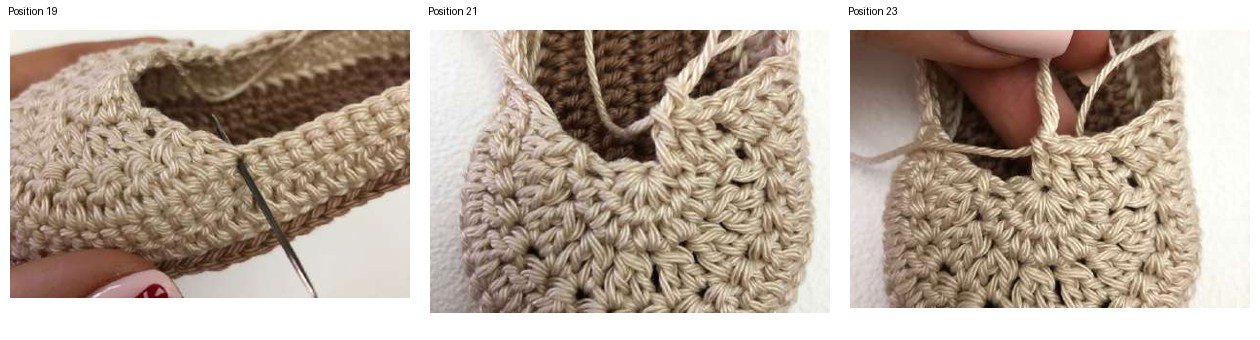
Row 1: Join yarn at the stitch shown at position 19. Ch 3 (counts as dc), 6 dc into the horizontal stitches of the toe, dc into the stitch shown at position 21, 6 dc into the next horizontal stitches of the toe, and work the last dc into the stitch at position 23. 15 stitches. Turn.
Rows 2–8: Ch 3 (counts as dc), dc in the next 14 stitches. 15 stitches. Turn after each row. Fasten off and cut yarn.

Upper part and laces
Use MC. The images show the joining position at 26 and the two final stitches at 28.

Row 1: Join MC at the indicated stitch. Ch 3 (counts as dc), dc in next stitch, dc in next 28 / 30 / 32 / 36 stitches, then dc in the next two stitches indicated in the placement photo. 32 / 34 / 36 / 40 stitches. Turn.
Rows 2–10: Ch 3 (counts as dc), dc in next 31 / 33 / 35 / 39 stitches. 32 / 34 / 36 / 40 stitches. Turn after each row. Fasten off and cut yarn.
Weave in the ends with a tapestry needle or crochet hook. Fold three rows of the upper part and insert the shoelaces or ribbon through the spaces, following the finished sample. Add the optional decoration if desired. Repeat every step for the second shoe.

How did your pair turn out?
Try the pattern and share which size, yarn, and lace option you used. Did the fit match the measured foot length? If a placement photo or decrease row felt unclear, mention the step in the comments and tell us what happened when you made it.
Leave a Reply