

← Previous pattern: Alpine Stitch Fingerless Gloves · Next pattern: Crochet Baby Shoes → · More wearables
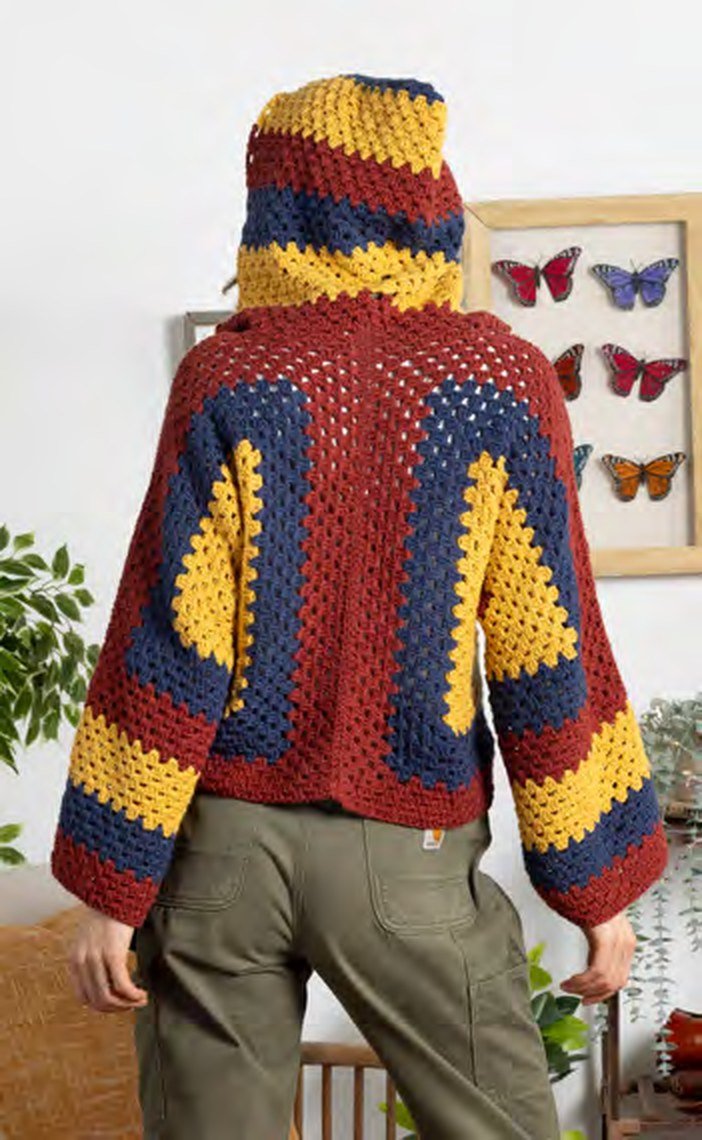
This crochet hexi hooded pullover grows from two granny-style hexagons. Fold and seam them to form the body and sleeves, then work a hood and extend the sleeves with striped cuffs. Four size groups cover a 28–60 in chest. The hexagons become wavy as they grow; that is part of the construction.
Pattern overview
Skill level: Easy, as specified for this pattern. Terms: US crochet. Construction: Two six-sided motifs, shoulder and center seams, a worked-on hood, and sleeve cuffs. The written steps and charts are both below.
Sizes and materials · Stripes · Hexagons · Folding and seams · Hood · Sleeve cuffs
Construction guide — tap to open
Make two identical hexagons to your size measurement. Fold and seam them into the body and sleeves, leaving the front neck opening. Crochet the hood along that opening, shape and seam its top, then continue the stripe pattern around each sleeve cuff. Follow every row and round in the full pattern below.
Sizes, yarn and gauge
| Size | XS/S | M/L | 1/2/3XL | 4/5XL |
|---|---|---|---|---|
| To fit chest | 28–34 in / 71–86.5 cm | 36–42 in / 91.5–106.5 cm | 44–54 in / 112–137 cm | 56–60 in / 142–152.5 cm |
| Finished chest | 38 in / 96.5 cm | 42 in / 106.5 cm | 56 in / 142 cm | 60 in / 152.5 cm |
| A: warm red, balls | 3 | 4 | 4 | 5 |
| B: golden, balls | 2 | 3 | 3 | 3 |
| C: seaside blue, balls | 2 | 3 | 3 | 3 |
Yarn: Bernat Softee Cotton, CYC 3 light, 4.2 oz / 120 g and 254 yd / 232 m per ball. Color A is Warm Red (69007), B is Golden (69023), and C is Seaside Blue (69011). Approximate amounts for sizes XS/S (M/L, 1/2/3XL, 4/5XL): A 750 yd / 682 m (855 yd / 777 m, 975 yd / 886 m, 1125 yd / 1023 m); B 510 yd / 464 m (590 yd / 537 m, 670 yd / 610 m, 765 yd / 695 m); C 495 yd / 450 m (565 yd / 515 m, 645 yd / 587 m, 745 yd / 677 m).
Hook and notions: US G/6 (4 mm) crochet hook or size needed for gauge, stitch markers, and yarn needle. Gauge: 16 sc and 20 rows = 4 in / 10 cm; six groups of 3 dc = 5 in / 12.5 cm.
Abbreviations and size order
beg = beginning; ch = chain; cont = continue; dc = double crochet; dec = decrease; pat = pattern; PM = place marker; rem = remaining; rep = repeat; rnd = round; sc = single crochet; sl st = slip stitch; sp = space; st = stitch; tog = together; RS = right side. Numbers appear in this order: XS/S (M/L–1/2/3XL–4/5XL); a single number applies to all sizes.
Seventeen-round stripe sequence
Work 5 rounds of A, 7 rounds of B, then 5 rounds of C. Those 17 rounds form one stripe pattern repeat. Continue that sequence while making the motifs, hood, and cuffs wherever the instructions say to maintain the stripe pattern.
Hexagon — make two
With A, ch 4 and join with a sl st in the first chain to make a ring. Both motifs are worked alike. The hexagon will not lie flat as it grows; fold it later as shown in the construction diagram.
Round 1: Ch 5 (counts as dc and ch-2). (3 dc, ch 2) five times in the ring. 2 dc in the ring. Join with sl st to the third chain of the beginning ch-5. Six groups of 3 dc and six ch-2 spaces.
Round 2: Sl st into next ch-2 space. Ch 5 (counts as dc and ch-2), 3 dc in the same space. *Skip next 3 dc; (3 dc, ch 2, 3 dc) in next ch-2 space. Repeat from * four more times. 2 dc in first ch-2 space. Join with sl st to third chain of ch-5.
Round 3: Sl st into next ch-2 space. Ch 5 (counts as dc and ch-2), 2 dc in the same space. *Skip next 3 dc; 3 dc in the space between the next two groups of 3 dc. Skip next 3 dc; (3 dc, ch 2, 3 dc) in the next corner ch-2 space. Repeat from * four more times. Skip next 3 dc; 3 dc between the next two groups of 3 dc. Skip the last 3 dc; 2 dc in first ch-2 space. Join with sl st to third chain of ch-5. The first three rounds of the stripe sequence are complete.
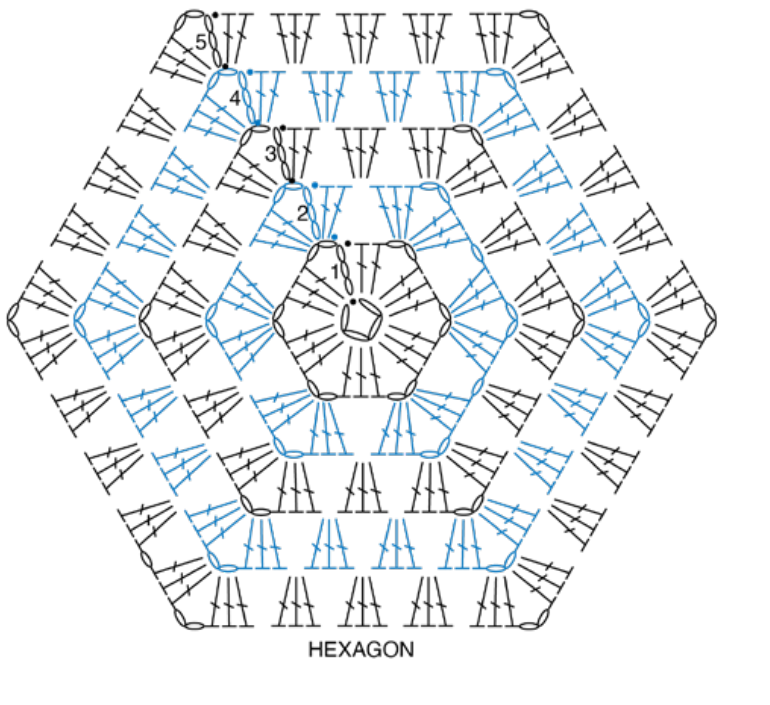
Round 4: Sl st into next ch-2 space. Ch 5 (counts as dc and ch-2), 2 dc in the same space. *Skip next 3 dc; work 3 dc in the space between the next two groups of 3 dc twice. Skip next 3 dc; (3 dc, ch 2, 3 dc) in next corner ch-2 space. Repeat from * four more times. Work 3 dc between the next two groups twice; skip the last 3 dc; 2 dc in first ch-2 space. Join with sl st to third chain of ch-5.
Round 5: Sl st into next ch-2 space. Ch 5 (counts as dc and ch-2), 2 dc in the same space. For each of the next five corners: *skip next 3 dc and work 3 dc in the space between the next two groups of 3 dc; repeat from * to the corner ch-2 space. Skip next 3 dc; work (3 dc, ch 2, 3 dc) in that corner. Then repeat the starred group to the end of the round. Skip the last 3 dc, work 2 dc in first ch-2 space, and join with sl st to third chain of ch-5. The chart above shows the group placement around the six corners.
Maintaining the 17-round stripe sequence, repeat Round 5 until the measurement from the center to a straight side of each hexagon is approximately 10½ (12–14½–16½) in / 26.5 (30.5–37–42) cm. Fasten off. Make the second hexagon the same way.
Fold and seam the pullover
Bring opposite points of the left hexagon together and fold it to form the left side; do the same with the right hexagon. Place a marker between 3-dc groups along the top edge 4 (4–5–5) groups from the front edge. Sew the center back seam, then sew the top sleeve seams to the markers. Sew the center front seam while leaving 5 in / 12.5 cm from the top corners for the front opening.
Hood
With the right side facing, join A with a sl st to the corner ch-2 space of the right-front lapel. Use the hood chart as a visual guide to the center-back increases and top shaping.
Row 1 (RS): Ch 3 (counts as dc), 2 dc in the same space as joining sl st. *Skip next 3 dc; 3 dc in the space between the next two 3-dc groups. Repeat from * to the last 3 dc before the right shoulder seam; work 3 dc in the shoulder-seam space. Repeat the starred sequence to the last 3 dc before the center-back seam. Skip next 3 dc; 3 dc in the corner ch-2 space before the seam, ch 3, then 3 dc in the corner ch-2 space after the seam. Repeat the starred sequence to the last 3 dc before the left shoulder seam; work 3 dc in the shoulder-seam space. Repeat the starred sequence to the last 3-dc group before the left-front lapel corner. Skip next 3 dc; work 3 dc in that corner ch-2 space. Turn. 18 (18–20–20) groups of 3 dc plus center ch-3 space.
Row 2, increase row: Ch 4 (counts as dc and ch 1). *Skip next 3 dc; 3 dc between the next two 3-dc groups. Repeat from * to center-back ch-3 space. Work (3 dc, ch 1, 1 dc as center dc, ch 1, 3 dc) in center-back ch-3 space. Repeat the starred sequence to last 3 dc; ch 1, skip next 2 dc, 1 dc in last dc. Turn.
Row 3: Ch 3 (counts as dc), 2 dc in first ch-1 space. *Skip next 3 dc; 3 dc between the next two groups of 3 dc. Repeat from * to the ch-1 space before center dc; 3 dc in that ch-1 space. Skip the center dc; 3 dc in the next ch-1 space. Repeat the starred sequence to the last ch-1 space; 2 dc in that space, 1 dc in last dc. Turn. 20 (20–22–22) groups of 3 dc.
Row 4: Ch 4 (counts as dc and ch 1). *Skip next 3 dc; 3 dc between next two groups of 3 dc. Repeat from * to last 3 dc; skip next 2 dc, ch 1, 1 dc in last dc. Turn.
Row 5: Ch 3 (counts as dc), 2 dc in first ch-1 space. (Skip next 3 dc; work 3 dc between next two 3-dc groups) 9 (9–10–10) times; ch 3 at center back. *Skip next 3 dc; 3 dc between next two 3-dc groups. Repeat from * to last ch-1 space; 2 dc in that space, 1 dc in last dc. Turn.
Rows 6–11: Repeat Rows 2–5 once, then Rows 2 and 3 once, with one extra 3-dc group before center on each repeat. At the end of Row 11 there are 24 (24–26–26) groups of 3 dc.

Row 12: Ch 4 (counts as dc and ch 1). *Skip next 3 dc; 3 dc between next two 3-dc groups. Repeat from * to last 3 dc; skip next 2 dc, ch 1, 1 dc in last dc. Turn.
Row 13: Ch 3 (counts as dc), 2 dc in next ch-1 space. *Skip next 3 dc; 3 dc between next two 3-dc groups. Repeat from * to last ch-1 space; 2 dc in that space, 1 dc in last dc. Turn.
Continue the stripe sequence and alternate Rows 12 and 13 until the hood measures about 10 in / 25.5 cm, ending on the second row of this two-row repeat.
Shape and seam the top
Shaping Row 1: Ch 4 (counts as dc and ch 1). (Skip next 3 dc; 3 dc between next two 3-dc groups) 10 (10–11–11) times. Skip the next two 3-dc groups. *Work 3 dc between next two 3-dc groups; skip next 3 dc. Repeat from * to last 3 dc; skip next 2 dc, ch 1, 1 dc in last dc. Turn.
Shaping Row 2: Ch 3 (counts as dc), 2 dc in first ch-1 space. (Skip next 3 dc; 3 dc between next two 3-dc groups) 9 times. Skip the next two 3-dc groups. *Work 3 dc between next two 3-dc groups; skip next 3 dc. Repeat from * to last ch-1 space; 2 dc in that space, 1 dc in last dc. Turn.
Fasten off, leaving a 20 in / 51 cm tail. Fold the hood top in half and sew its seam with the tail, keeping the edges flat.
Sleeve cuffs and finish
With RS facing, join the corresponding color in the last space between two 3-dc groups before the shoulder seam, at the bottom of the sleeve. Continue the stripe sequence.
Cuff Round 1: Ch 3 (counts as dc), 2 dc in the joining space. *Ch 1, skip next 3 dc; 3 dc between the next two 3-dc groups. Repeat from * around, ending with ch 1. Join with a sl st to top of beginning ch-3. The cuff chart shows a chain between 3-dc groups; this creates the ch-1 spaces used in Round 2.
Cuff Round 2: Sl st in each of next two dc and into next ch-1 space. Ch 3 (counts as dc), 2 dc in that ch-1 space. *Ch 1, skip next 3 dc, 3 dc in next ch-1 space. Repeat from * around; ch 1 and join with a sl st to top of beginning ch-3.
Continue the stripe pattern, repeating the last round until the sleeve measures 17 in / 43 cm from underarm. Fasten off and repeat for the other sleeve.

Share your result
Try the pullover and tell us which size and color combination you made. Did the hexagons fold into the shape you expected, and did the hood or sleeve length need adjustment? Share your result or the exact step that felt unclear in the comments so other makers can compare notes.
Leave a Reply